I’d like to share some of the wisdom of Linda Chalker-Scott. She’s famous for dispelling some of the long-held “myths” about plants and planting – and, if not dispelling them, certainly indicating whether there is really any good evidence to support them.
LINDA CHALKER-SCOTT Horticultural Myths
Dr. Chalker-Scott is an Extension Urban Horticulturist at the Puyallup Research and Extension Center of Washington State University as well as an Associate Professor of Horticulture and Landscape Architecture at WSU.
You may know her from: The Blog
or her Podcasts: The Informed Gardener
or her Books, including “How Plants Work”

In one of her presentations, she addresses that horrible, yet oft-asked question:
Why do so many landscapes fail? And, in particular, why do so many newly-planted trees fail?
In her view, it all boils down to this – trees that fail have poor root establishment. Why?
I’ll give you the gist of her reasoning, then add my own tips.
Reason 1: Tree roots are already comprised when the plant is purchased. So what can you do?
Choose trees that:
• have heights appropriate to pot size
• are free from damage and disease
• have not been improperly pruned
• have a strong central leader (unless multiple leaders are natural for the species)
• have branches well-distributed along trunk
• do not have included bark
My First Tip: unwrap the burlap around the trunk; don’t be afraid to ask the nursery to pull it out of the row to let you have a closer look at it
My Next tip: Try to ascertain whether the root ball has dried out during the time its been sitting in the Nursery, and ask directly if the tree is “left over” from the previous season. If the root ball has dried out, it will be very difficult to “re-wet” it and you will have to pay attention to doing that before you plant. If the tree has been sitting in the Nursery all summer, or since last year, it can still be OK but forewarned is forearmed.
My Third Tip: once the tree comes off the truck, have another look. Is it the same one that you tagged? If not, you can return it without any guilt (just call first). Are there broken branches from loading and/or transport? If so, prune away any damaged (or dead) branches right at the start – you’ll never have better access to the whole tree than when its sitting on the lawn all by itself.
My Last Tip: make sure the burlap at the base of the trunk is cut away. This can usually be done while still keeping the lacing intact in case the crew needs to use the lacing to move or rotate the tree during planting. Try to get any idea of how far down the trunk flare is buried within the root ball, so that you can make as accurate as possible a measurement for the depth of the planting hole
And P.S. remove all the plastic tape from the branches and trunk while you can still reach it. Don’t leave tags on!
Reason 2: Improper soil management at the time of planting. So what can you do? The first thing is – do a soil test.
Urban landscape soils can be heavily compacted and/or have abrupt layers, creating perched water tables. The soil that’s left after the site has been disturbed by construction does not necessarily resemble “native” soil types. Soils need to be tested before selecting plants or adding amendments.

Soil compacted by construction
Even if you’re working on a property where the plantings are already established and the soil is not “new”, you must still get a soil test. And the soil can still be compacted, because trucks, pick-up trucks and equipment are not the only causes of compaction – compaction can result from foot traffic or erosion as well.
The results of compaction are reduced water and air movement within the soil, impeding root growth. If tree roots can’t grow into the surrounding soil, then they can’t get enough air, water and food to support the growth of the tree, so it has to start using its energy reserves. Newly-dug trees don’t have much of an energy reserve, since they’ve recently had up to 90% of their roots eliminated by the machine used to dig them. So they can begin to enter a process of decline and they may drop their leaves to conserve water.

The Chalker-Scott “first commandment” of soil management:
Don’t Amend Soil that doesn’t need to be amended – too much fertilizer is bad/unnecesssary/expensive to the environment
One of Dr. Chalker-Scott’s Horticultural Myths is: Why do folks think they should apply fertilizer always every year, every season? She says:
“this is a misapplication of agricultural practices to urban landscapes.” In annual crop production, the system is predicated on annnual disturbance. Vegetation is removed yearly, and the soil has to be amended on an annual basis.
In a “permanent landscape”, the soil is not disturbed annually (unless everything you planted dies!) and its not feasible to amend the soil after plants are installed, except by adding top-dressing of some kind.
My tip: Crops have to be fertilized in order to maximize their value as food sources within the limited time of a growing season. Since crops are harvested, there’s little opportunity to recycle nutrients back into the soil (that’s why there’s crop rotation and cover crops are planted). Your landscape is not a crop!
Soil Tests: Make sure you request the tests that you need to understand the properties of the soil you’re working with. If you’re unsure, speak to someone from your chosen testing lab to help you figure out what you need. Soil tests are in many ways geared toward agriculture – they tell you what nutrient levels are not optimal and recommend amendments which farmers can then incorporate into their fields. For ornanental horticulture, the information you need includes how much organic matter is in the soil, as well as what the nutrient levels are and whether there are any “bad” things in the soil, like salt or heavy metals.
If your soil test comes back with high nitrogen levels and the recommendation is NOT to add any nitrogen, this will alert you that plant problems that your site is experiencing can’t be fixed with fertilizer. So you’ll have to start looking for other causes for poor plant health - soil compaction, over- or under-watering, too much or too little sun for the plants that are there, overcrowding, nutrient overload, improper grading, too much mulch, planting too deep etc.
You should be aware that “more” is not always (or maybe never is) “better”
Dr. Chalker-Scott says:
Ideal soils, from a fertility standpoint, are generally defined as containing no more than 5% OM by weight or 10% by volume
Know your soil test results
Be conservative with organic amendments; add only what is necessary to correct deficiencies and maintain OM at ideal levels
Do not incorporate organic amendments into the soil of planting beds destined for permanent installations, unless tests show less than 5% OM; topdress with mulch instead
Abnormally high levels of nutrients can have negative effects on plant and soil health
Any nutrients not immediately utilized by microbes or plants contribute to non-point source pollution
The second thing you can do: don’t plant too deep (or too high unless you smooth the grade around the tree or create a berm).

Planted too low

Planted too high
This is in many ways one of the most difficult things to do, because the methods and procedures for growing trees and digging them inevitably result in soil being piled up over the root flare. You have to be diligent to remove as much of this excess soil as possible during planting. Sometimes you’ll be disgusted by how much soil you have to remove. And sometimes you’ll have to insist that the crew remove this soil because they may not understand how important it is. The more of an idea you have of how much soil has to be removed before you put the tree in the hole, the better, because there’s nothing worse (or often more impossible) than asking the crew to take the tree back out of the hole!
My Tip: Don’t ever ask the crew to take a tree that took multiple guys to move back out of a hole! First of all, it can’t be done. They slid it into the hole but they would have to lift it out - only a machine can do that. Learn how to figure out how to place trees before you start digging - use a pole or a person to “be the tree” then look from every possible angle.
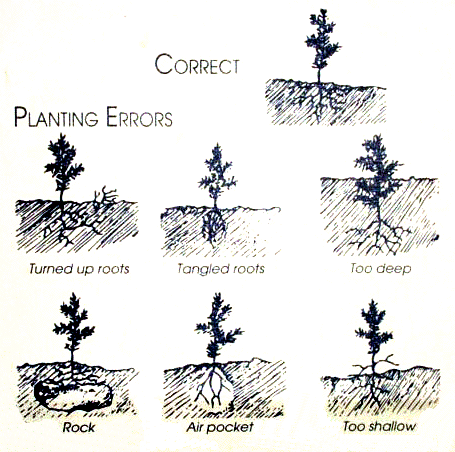
Look for the root flare

Kid’s have the right idea: trees flare out at the bottom, so kids draw them that way. Trees should not look like telephone poles coming straight out of the ground.


A telephone pole orchard
The third thing to do is to determine whether the soil is compacted.
You can often tell by looking. Or trying to dig. Or noticing standing water after it rains. Feel it; determine its texture. If you need to, you can do a simple percolation test - information available on the internet tells you how to do this. Also, think about what was in the area before, notice whether there’s evidence of recent construction work or whether this area was the “construction road” that the contractors used when they were building the pool.
The best method for de-compacting soil is controversial and definitely depends on the size of area you’re working with. If its a large area and you’re starting all over again, then maybe the “scoop and dump” method invented by Nina Bassuk will work. This is a link to her method:
http://www.hort.cornell.edu/uhi/outreach/pdfs/scoop-and-dump-short.pdf
If its a relatively small area, then loosening the soil can often help.
In any event, you’ll need to decide how to improve the soil over the long term. Maybe you plant the area with a type of ornamental grass that has deep roots that can penetrate compacted soil.
My tip: Used raised beds and/or berms so that you can add enough new soil on top of the compacted soil to support plant growth (12 - 18 inches will work; even less sometimes).
The fourth thing to do: top-dress with organic mulch

Linda Chalker-Scott says:
Organic mulches will:
- provide a slow release of macro- and micronutrients
- improve soil structure by reducing compaction and allowing aggregates to form
- enhance establishment of trees and shrubs in low-maintenance landscapes
- enhance beneficial microbes, which can outcompete pathogens if soils are healthy
- enhance soil macrofauna biodiversity
My First and Most Important Tip: Learn to mulch properly around a tree!

NO! Mulch should never be piled up around the trunk like this - why do people do this???
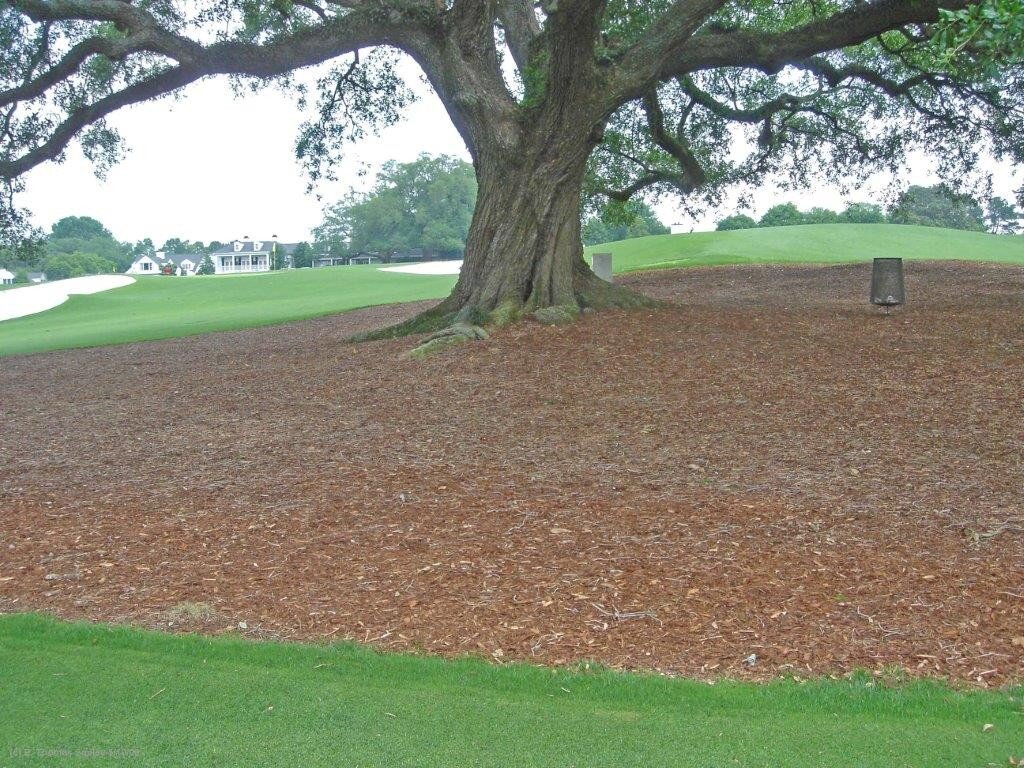
YES! A beautiful, smooth, flat skirt of mulch around a beautiful tree. It protects the entire root zone of this mature tree and looks neat and clean; easy to maintain; no need to attempt to grow grass underneath.
My Next Tip: If you’re buying mulch in bags, I recommend Coast of Maine products like Dark Harbor Blend Enriching Mulch. You get what you pay for in mulch (as well as in most other aspects of life). If you’re buying in bulk, get to know your supplier and understand how the mulch is made and where it comes from so that you can trust its quality. Or at least purchase “premium mulch” from the wholesale nursery.
My Third Tip: if bulk mulch stinks when you load it on the truck, think twice. To quote the child of one of my clients: “It used to smell pretty good around here until you guys showed up”
My Fourth Tip: Weed the garden, remove debris and rake out the beds before you mulch. Sometimes just raking looks fine and you might not need to mulch. Especially if you’re trying to get “living mulch” groundcovers to spread.
My Next Tip: Only add mulch once per year - I recommend late spring or early summer, because a lot of the weeds have sprouted by then so you really clean up the garden effectively before mulching. Also, you can see “holes” in the design by then and add plants to fill them before mulching.
Another tip: Don’t mulch in March! Or even early April. Many of the perennials haven’t started to come up and you will suffocate their crowns – then poof! - no more perennials!
And this is not a tip, it’s a mantra: The purpose of winter mulch is to keep the ground frozen. Ergo, don’t mulch until the ground is frozen. (Good luck with that; some winters these days the ground doesn’t freeze until after the crews have stopped working). The worst thing you can do to a landscape in late fall is to violently blow away all the leaves, and with them a lot of the mulch that you put there a few months before, then add 3 inches of fresh mulch. Yes, the client may tell you they want their garden beds to look “clean”, but its your responsibility is to come up with a design and planting plan that always looks “clean”.

This?

Or this beautiful layered planting done by Thomas Rainer: Planting in the Post-Wild World