Plant(s) of the Year 2020

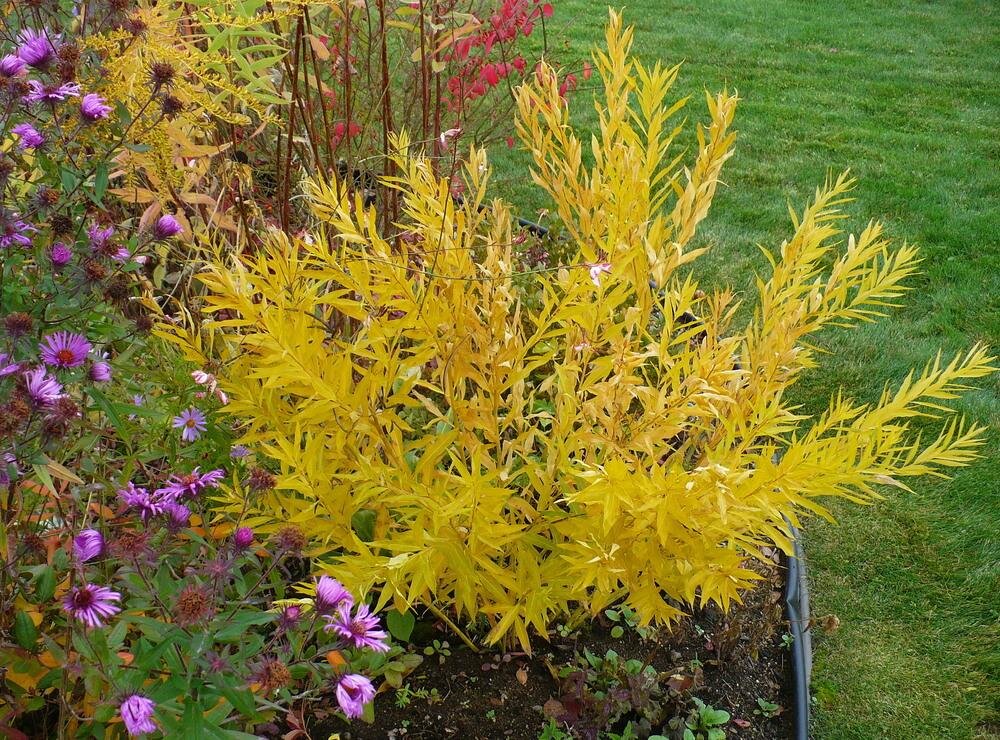
2020 Perennial Plant of the Year™:  Aralia cordata 'Sun King' (Common name: Japanese Spikenard)

The Perennial Plant Association has chosen Aralia cordata 'Sun King' as its 2020 Perennial Plant of the Year™.  'Sun King' was introduced by famed plantsman Barry Yinger who found it in a department store in Japan and brought it back to the states.  It has become popular as something “unique and different” to plant in the shade garden.  It has tropical-looking compound leaves that can measure a few feet long.

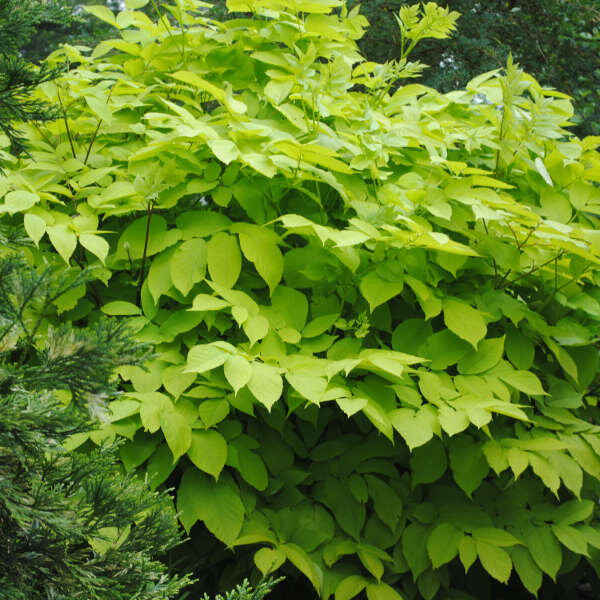
 ‘Sun King’ emerges mid-spring with bright gold leaves held on nicely contrasting reddish brown stems.  If given at least a few hours of sun a day, the foliage will remain yellow all summer.  In heavier shade, the foliage ranges from chartreuse to lime green.  In spite of its name, too much sun will cause leaf burn.

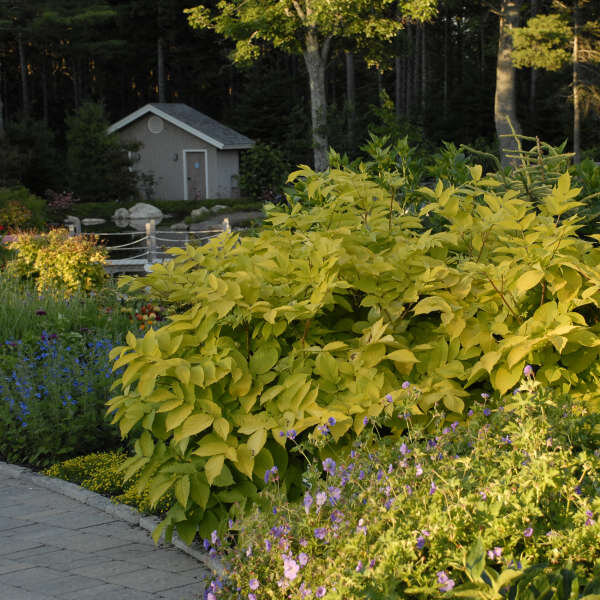
‘Sun King’ typically dies back to the ground in winter in our area, but quickly re-emerges in spring to form a large shrub-like clump of foliage which resists deer browsing.  It grows about three feet tall and wide.

In mid to late summer, interesting racemes of tiny white flowers are produced followed by deep purplish black, inedible berries. Like most Aralias, the flowers attract honeybees and other pollinators.

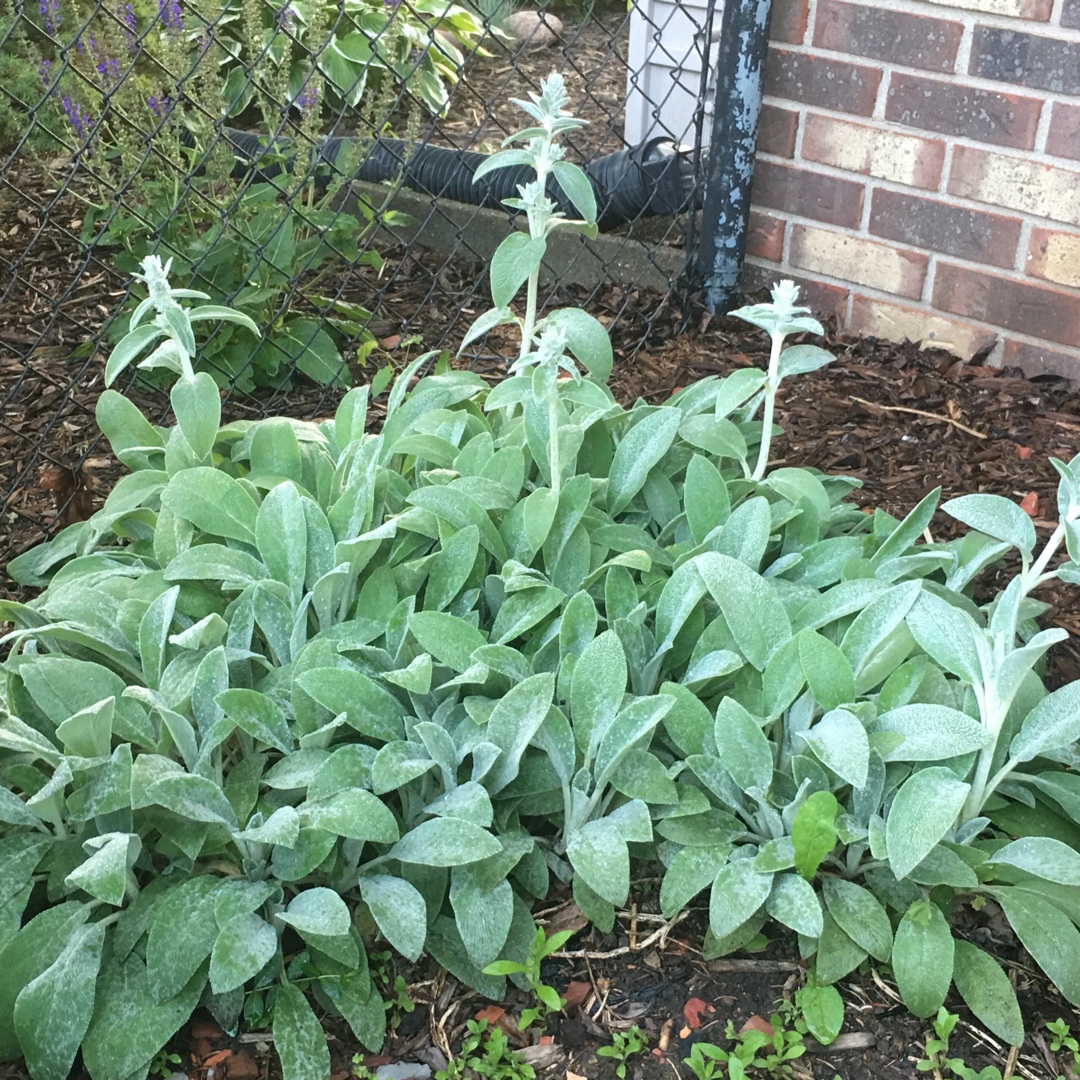
I have to admit I’m not fully convinced as to whether we know if this plant will end up being invasive. I have shuddering thoughts of Japanese Knotweed - that was thought to be an ornamental at first too. I’ve planted it at one property - it’s true it does add bold leaves, a big presence and good color to the shade border. Also true that deer don’t seem to be interested in it. We’ll see.

A few other perennials to get to know in 2020

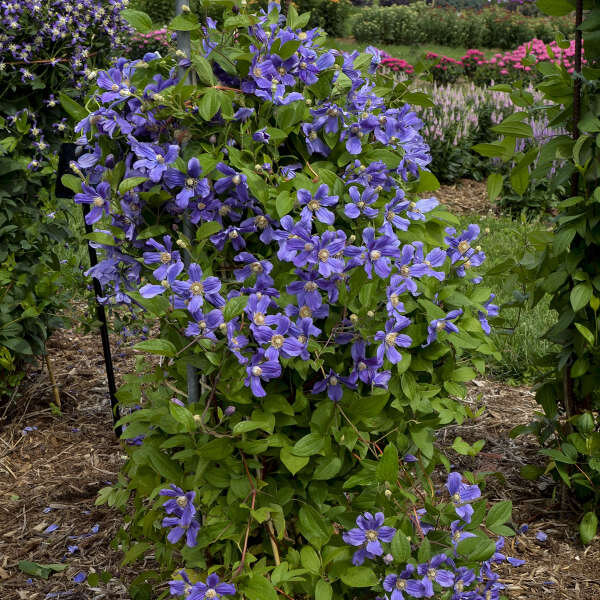
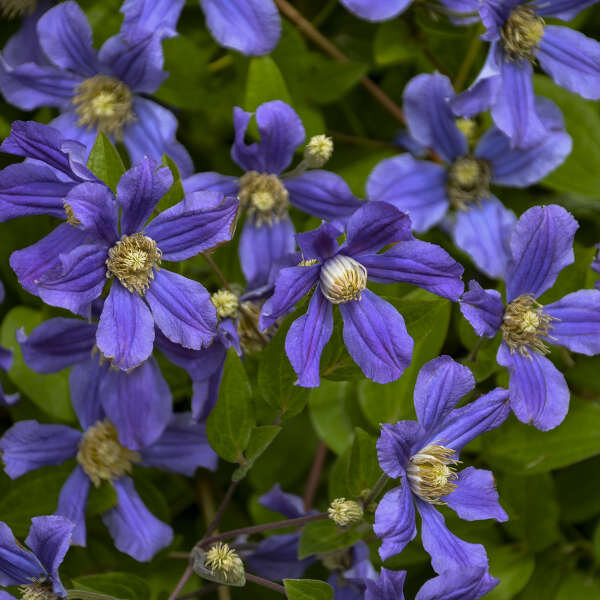
Clematis ‘Rain Dance’ (Common Name: Bush Clematis)

If you’re not familiar with non-vining clematis, its time to try one.  They “read” more like a shrub in the garden, are very floriferous, and can be a groundcover or waterfall over a wall.

‘Rain Dance’ was hybridized by Walters Gardens, and has flowers as large as what you'd see on a vine clematis (flowers on non-vining clematis are usually smaller than those of vining forms).  It has large (2.5-3"), outward facing indigo blue flowers with darker midribs and lighter margins.  

Bush clematis varieties bloom first on new growth beginning in midsummer, and then again on new shoots in early fall.  Although ‘Rain Dance’ is non-vining, the plant will benefit from support, either from staking, a garden obelisk, or from neighboring plants.  The growth habit of non-vining clematis makes them a little difficult to prune.  The upside is that there are no tendrils to get entangled with one another, so its easy to spread out individual stems without breaking them.

‘Rain Dance’ belongs to Clematis Group 3 - Late flowering cultivars – so you can prune them in late winter or early spring.  All shoots can be cut back to the previous year's wood, just above the base of the plant.  This pruning avoids getting bare stems, but spring flowers will be eliminated for that year; late summer flowers will still be produced.  Alternatively, if you don't want to cut the entire plant back all at once, pruning can be done in stages over a period of 3 years.  Each year, prune back 1/3 of the stems to 6-9 inches above a couple of well-developed buds.

That might sound like a bit of work, but bear in mind its positive qualities:

·       Deer & Rabbit resistant

·       Rebloomer

·       Attracts butterflies; bee-friendly

·       Not fussy about soil

The habit of non-vining clematis (though this is a different cultivar called ‘Sapphire Indigo’

The habit of non-vining clematis (though this is a different cultivar called ‘Sapphire Indigo’


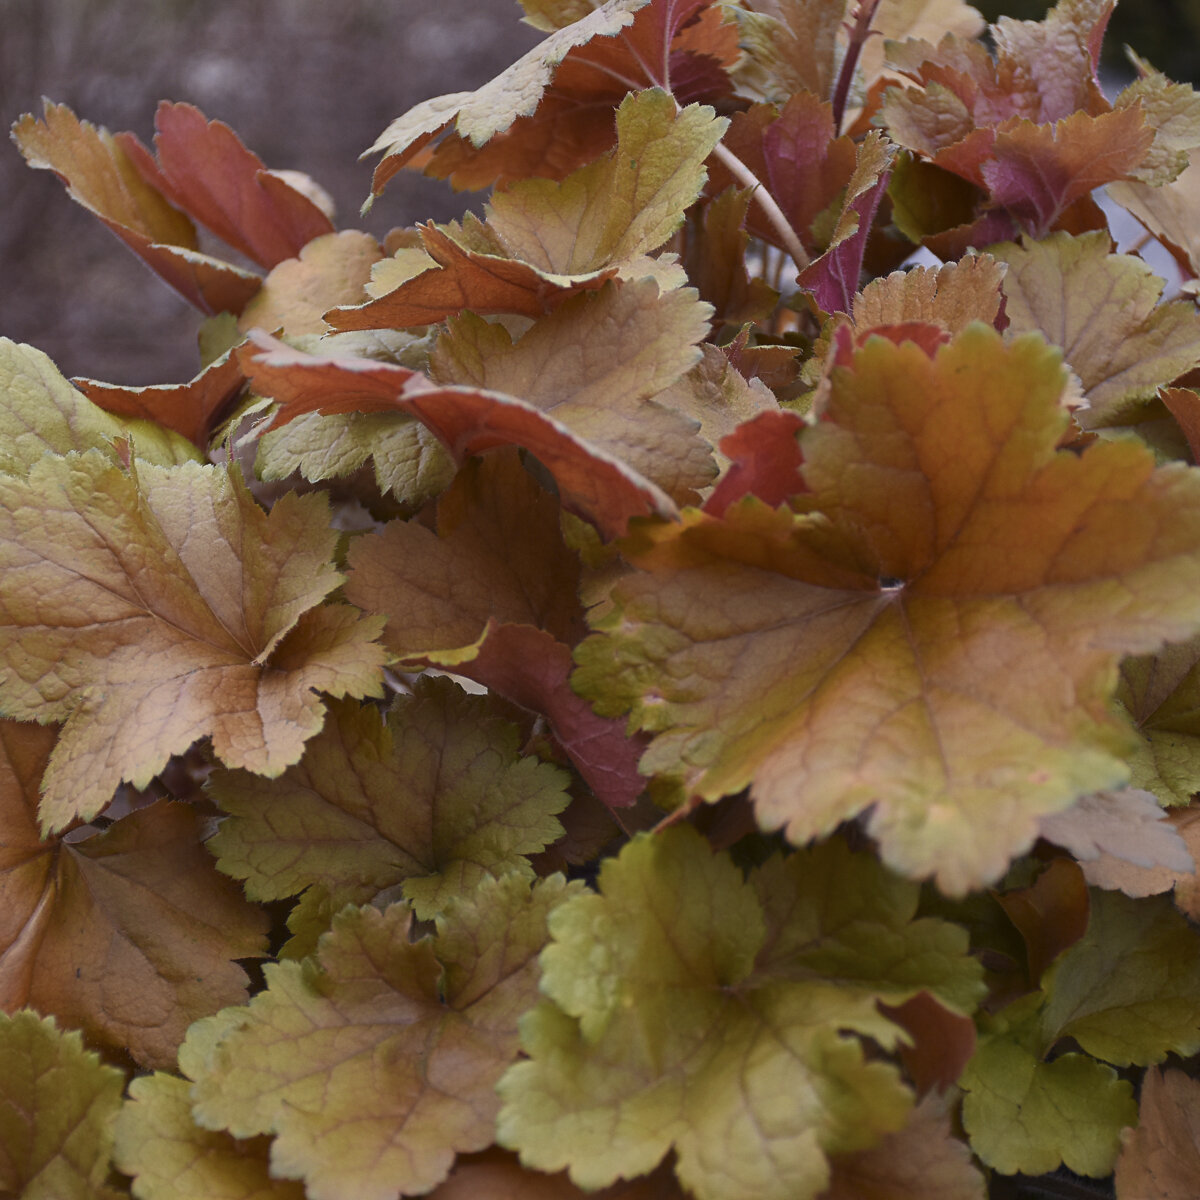
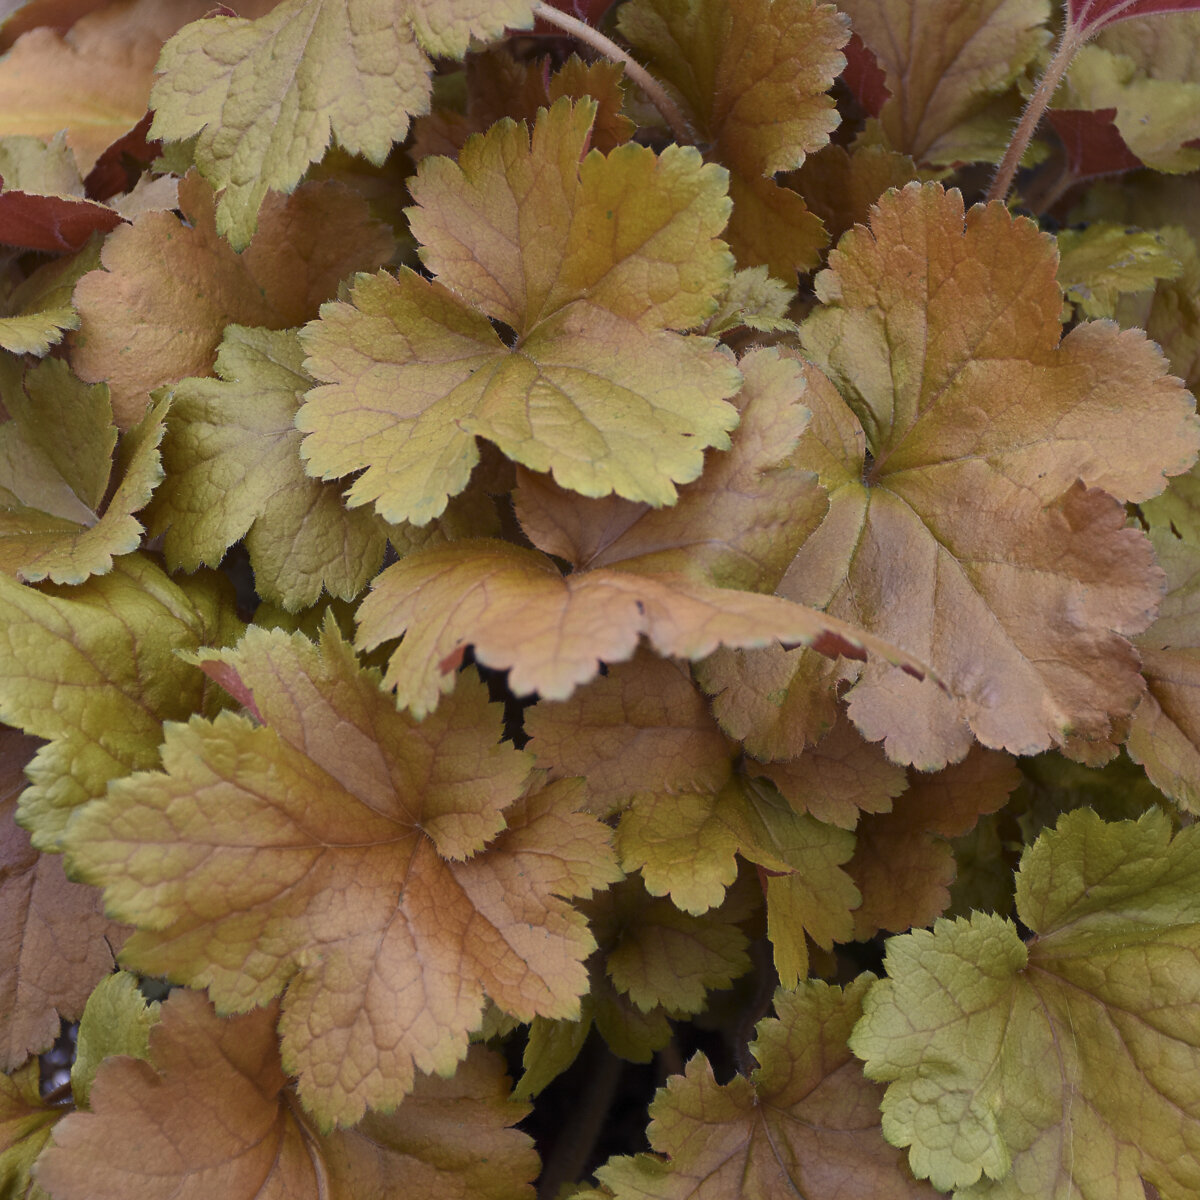
Heuchera ‘Toffee Tart’ (Common Name: Coral Bells)

This new member of the Proven Winners® Heuchera collection displays differing shades of ginger caramel throughout the seasons.  In spring, the newest leaves emerge amber with a silver overlay.  Leaves take on a ginger color with silver overlay as they mature. Then in late summer, leaves mature to green.  This variety has an interesting color that blends easily with most other perennials.  It’s not as “loud” as purple-leaved varieties, “softer” than ‘Caramel’ and “reads” better than ‘Dale’s Strain’.  Since ‘Toffee Tart’ has a lighter leaf color, grow in partial shade (preferably afternoon shade) (do not plant in full sun).

Heucheras are semi-evergreen in our area.  Depending on winter conditions, the plants can look a little tattered by early spring.  In that case, just shear off any damaged leaves to make room for the vibrant new foliage which will fill in quickly.

Heucheras can be grown under Black Walnut trees because they are resistant to the toxin Juglone which the trees emit from their roots.  Heucheras are also salt tolerant. They are useful along pathways which are salted in winter or for people gardening in coastal regions.  

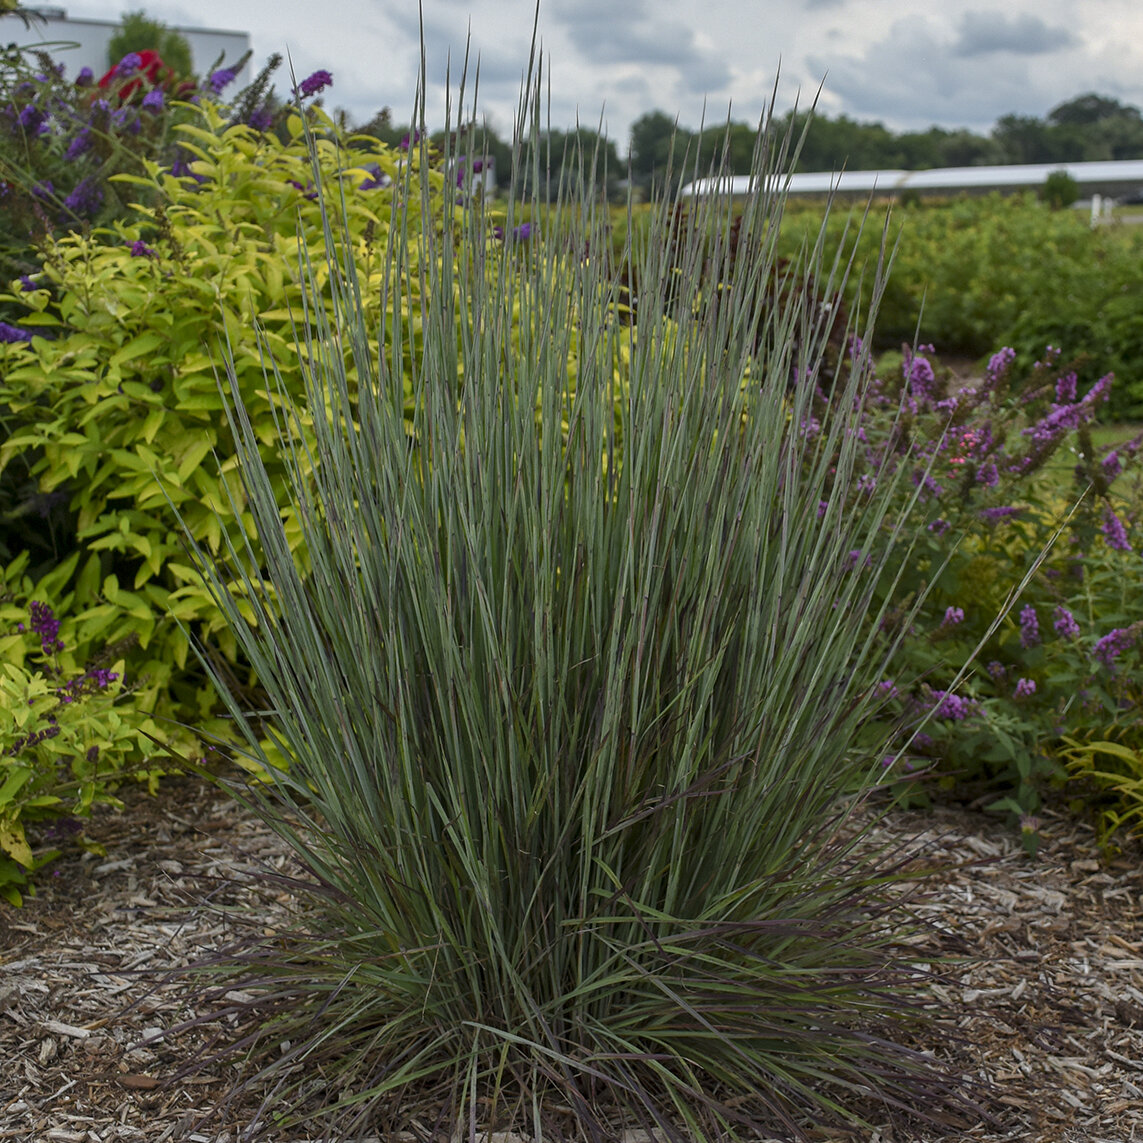
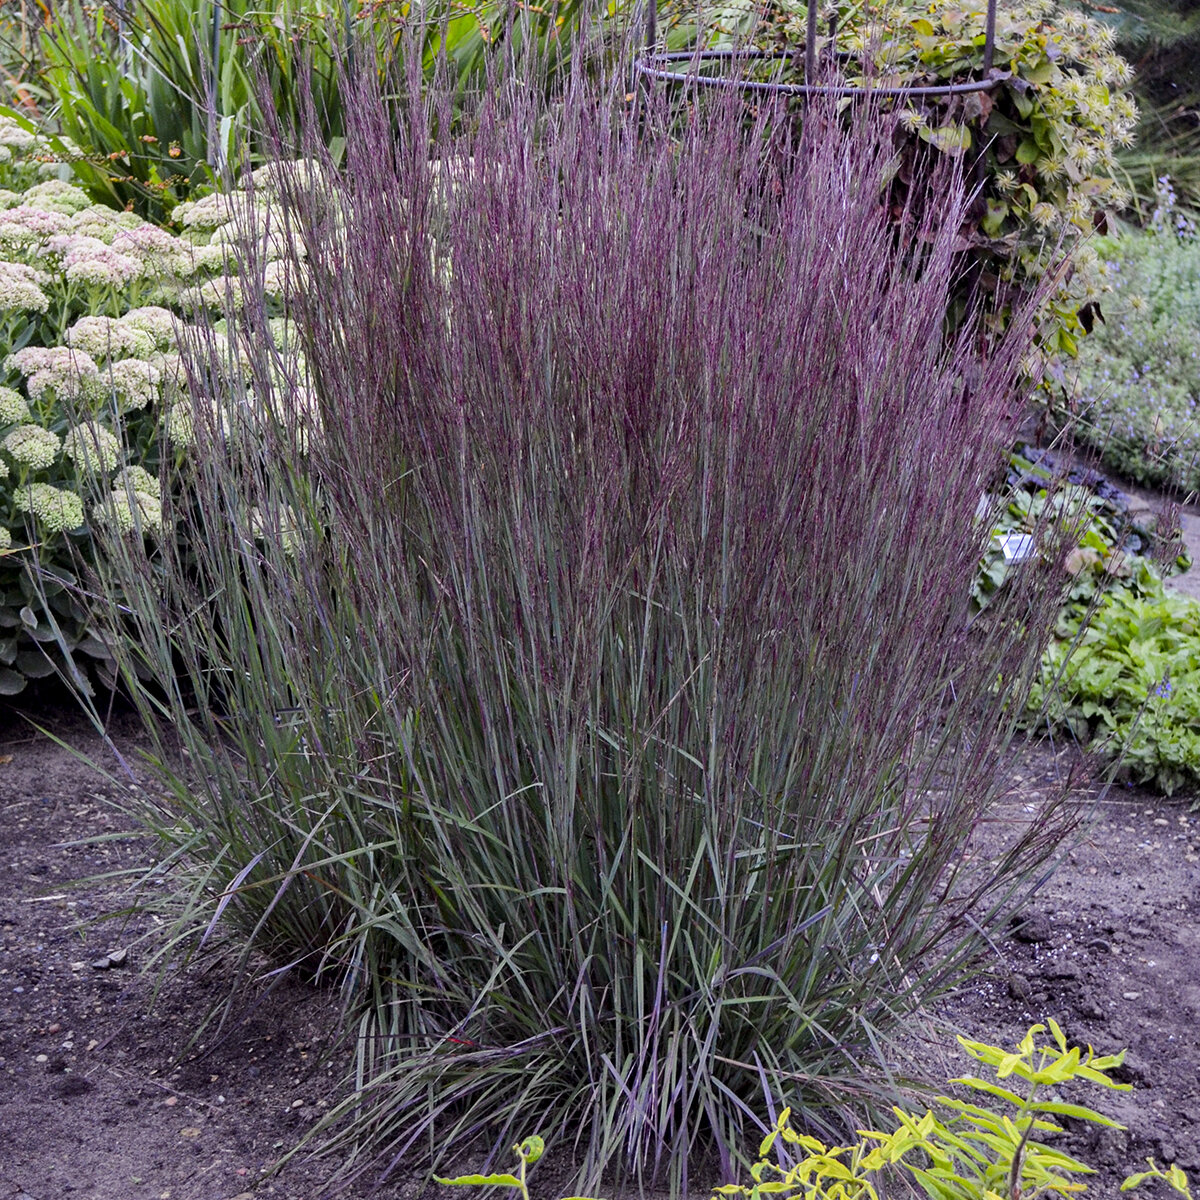
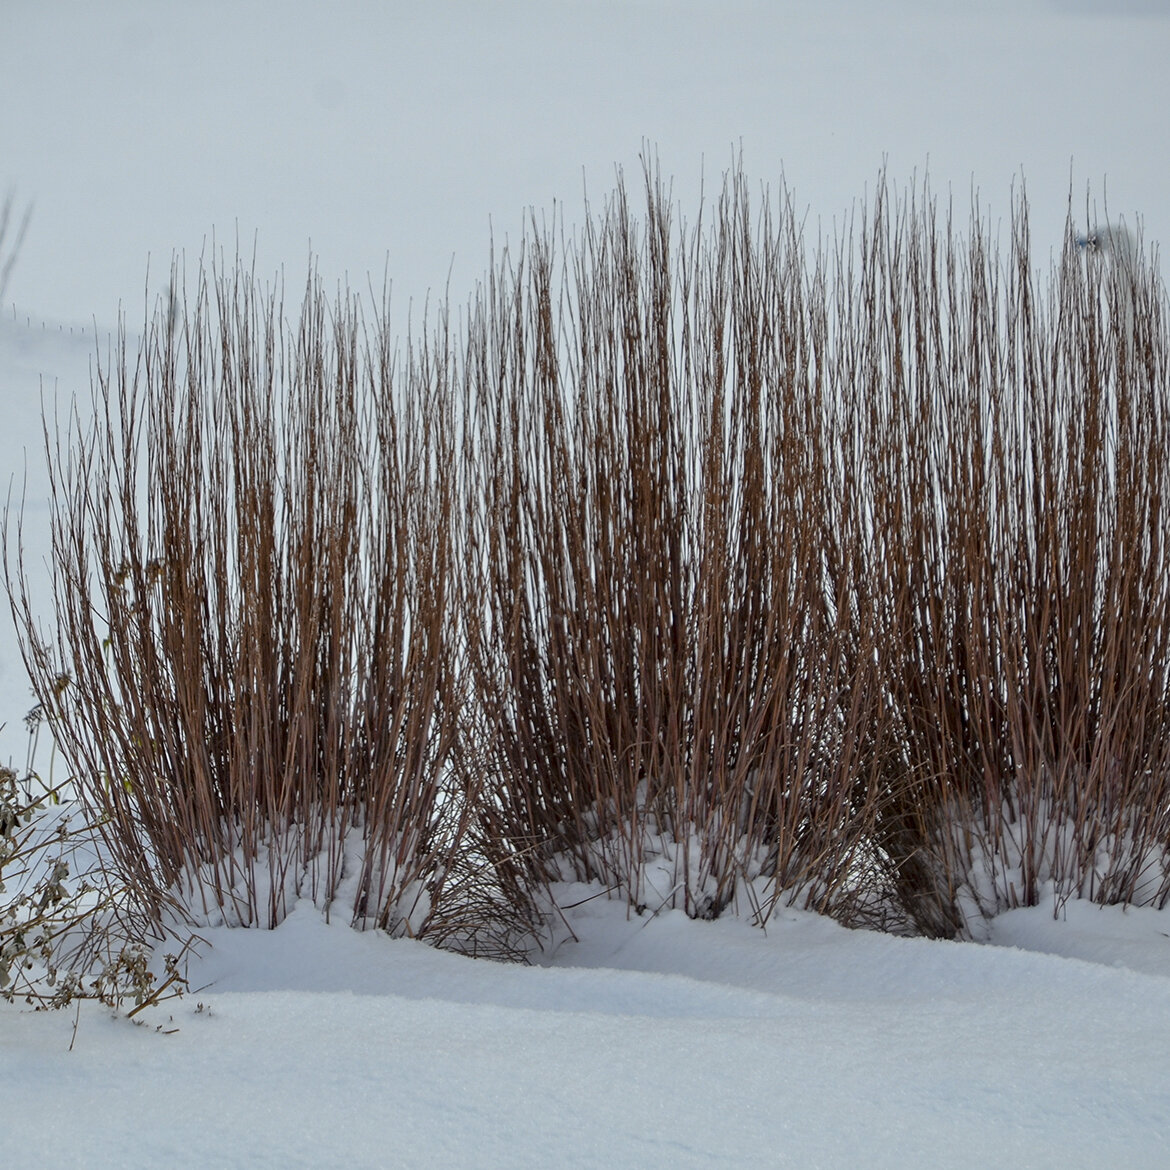
Schizachyrium scoparium ‘Blue Paradise’ (Common Name: Little Bluestem)

This variety of Little Bluestem was bred by Walters Gardens, Inc.  Its habit is very upright and columnar, and it maintains its upright habit through fall.  At 3½ feet tall, this grass can be the perfect backdrop to a garden.  ‘Blue Paradise’ has striking silvery blue stems in summer.  In the fall, this grass takes center stage as the leaves develop a deep wine purple color. 

Schizachyrium is a great choice if you are looking to restore an eroded site, or for a plant that will grow in hot, dry areas where other plants have a hard time surviving.

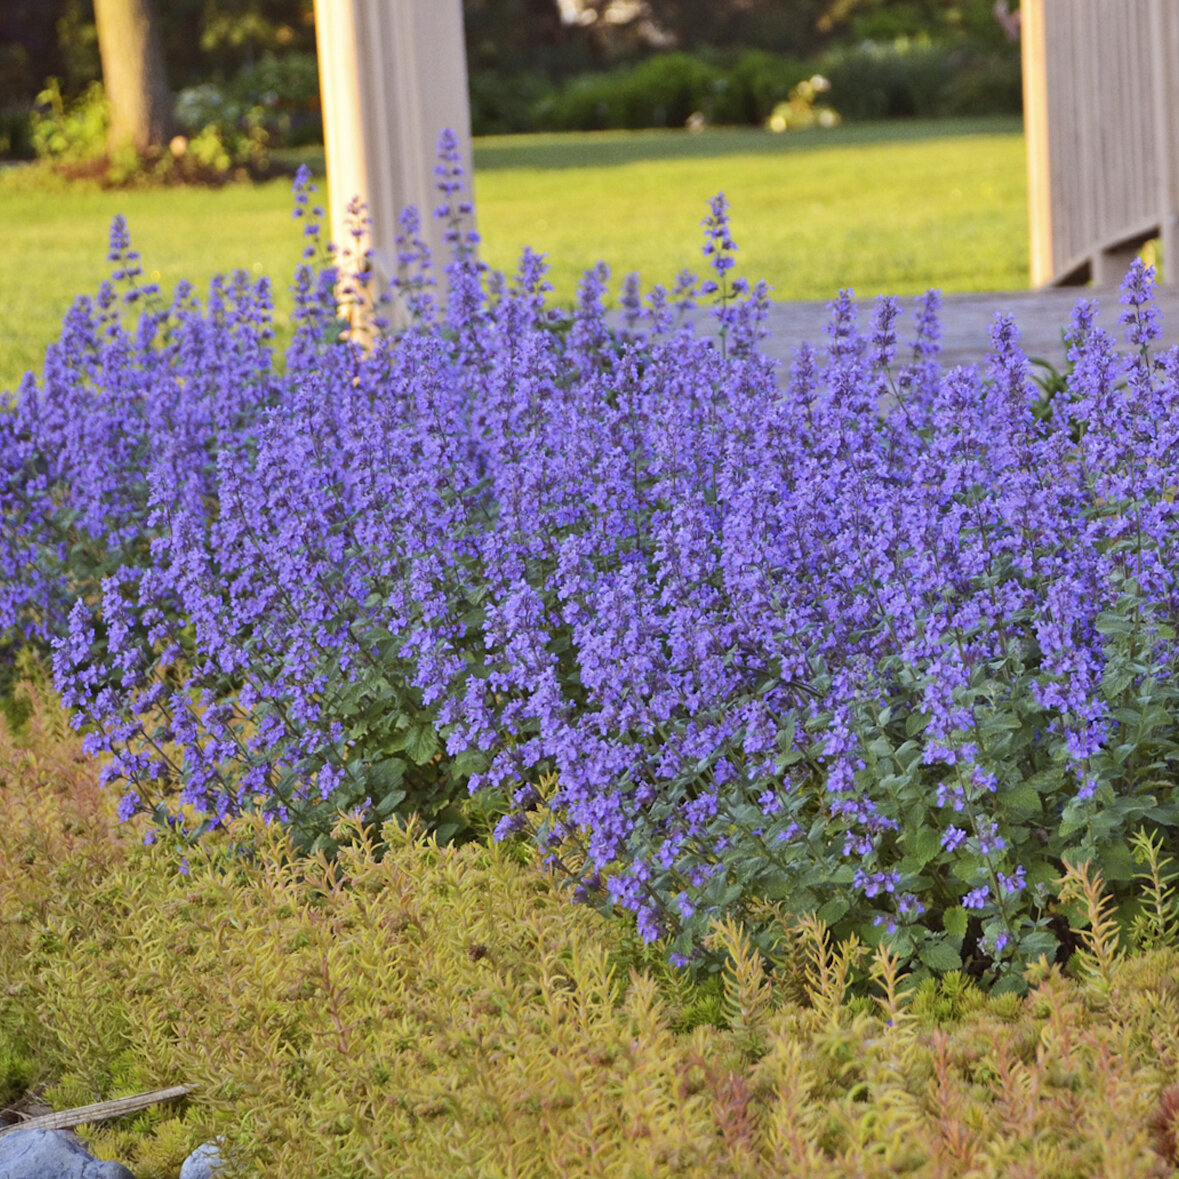
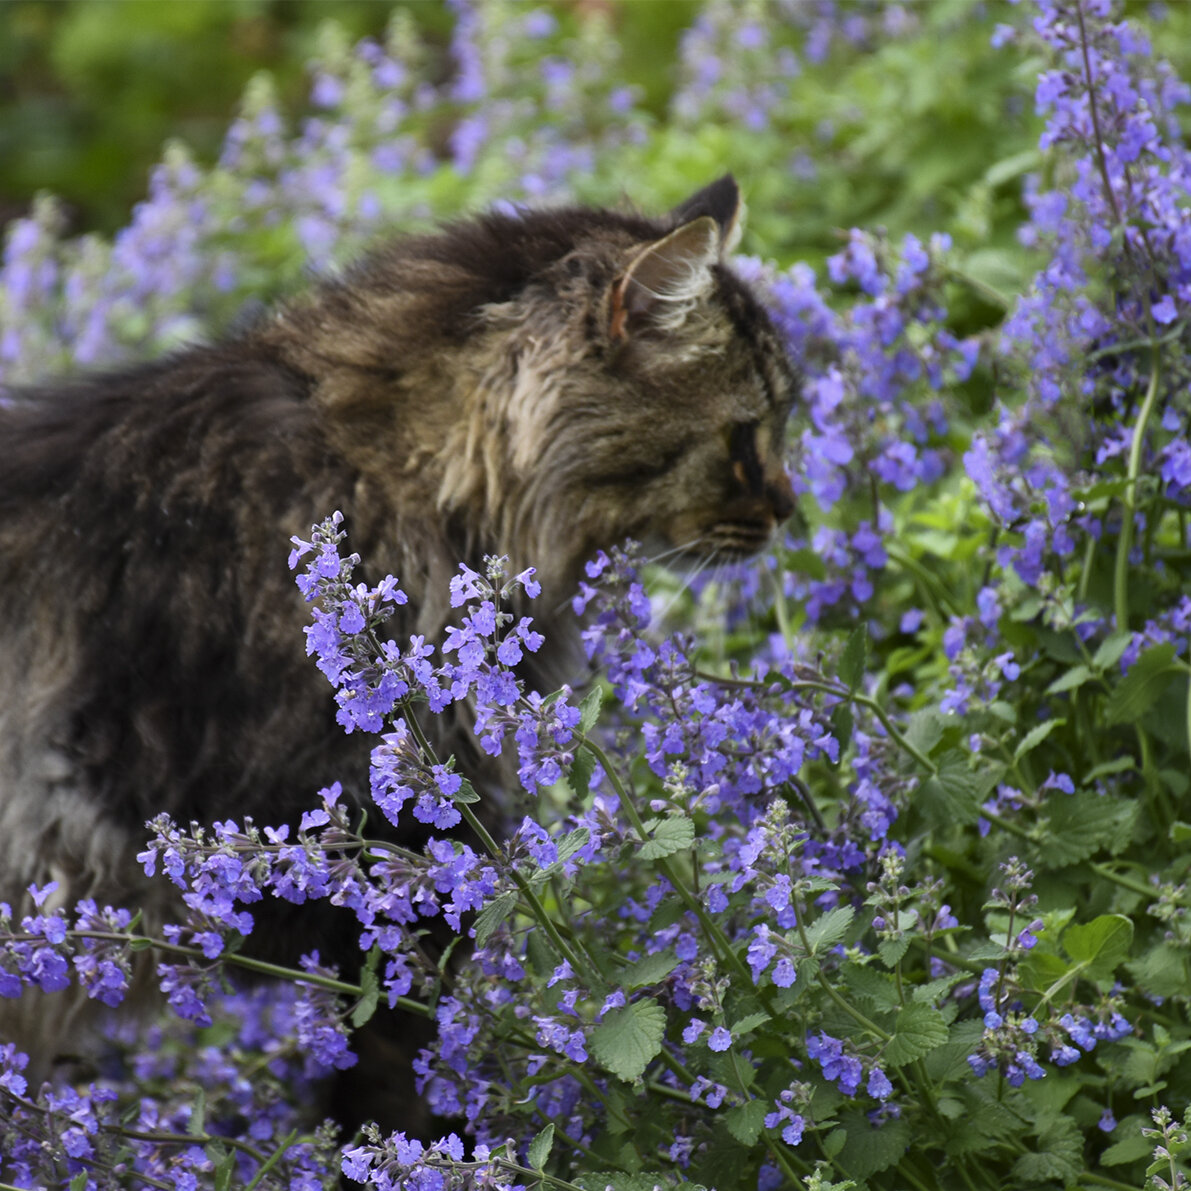
Nepeta faasennii ‘Cat’s Meow’  (Common Name: Catmint)

‘Cat’s Meow’ has everything you’re looking for: a low maintenance, drought tolerant, deer resistant, long blooming perennial that looks great all season.  Unlike most Nepetas that have a bit of a wild, unkempt look, this first class selection keeps its tidy, dense, rounded shape all season long. 

Its small, grey-green, aromatic leaves are topped with well-branched stems carrying spikes of sky blue flowers with purple calyxes from early summer into early fall. 

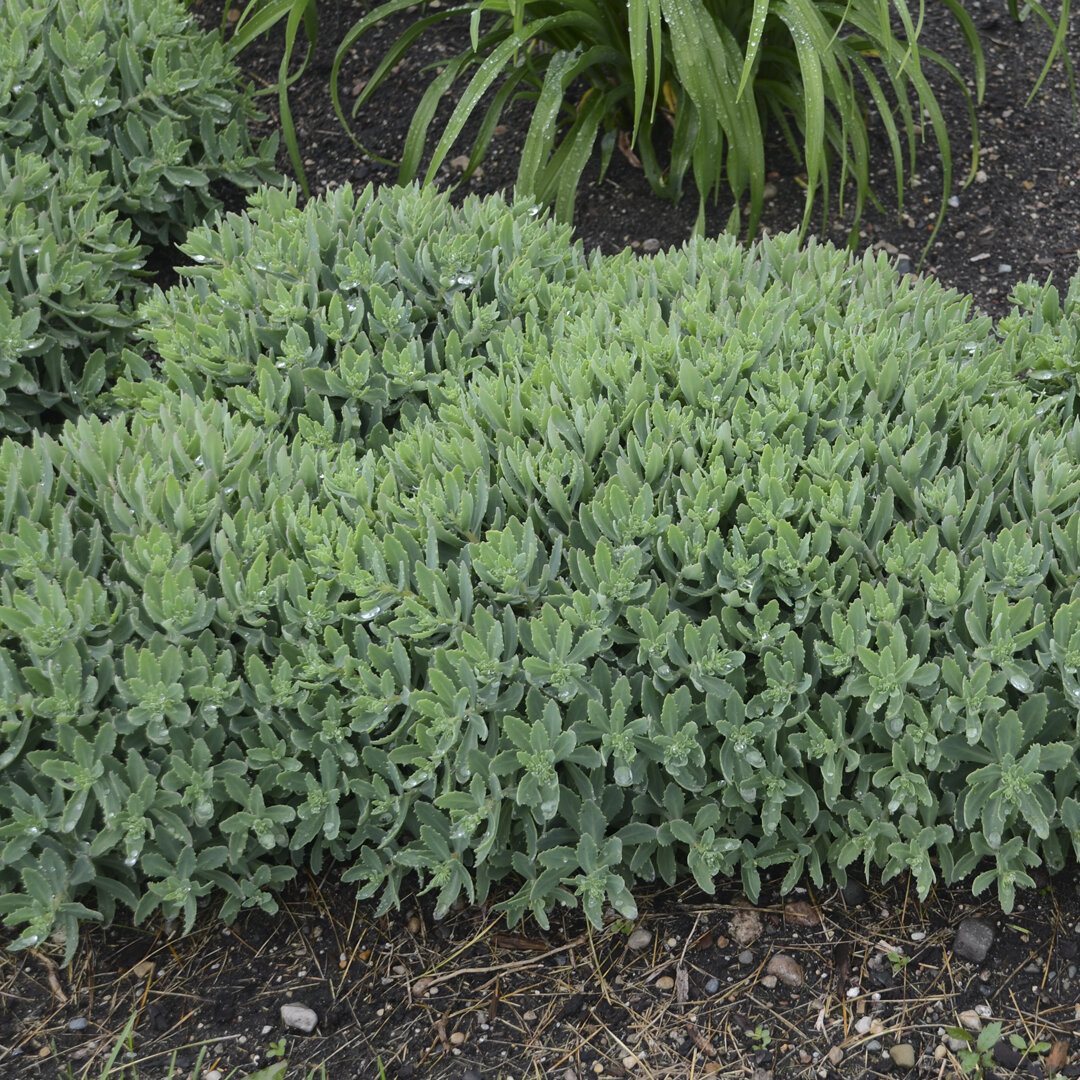
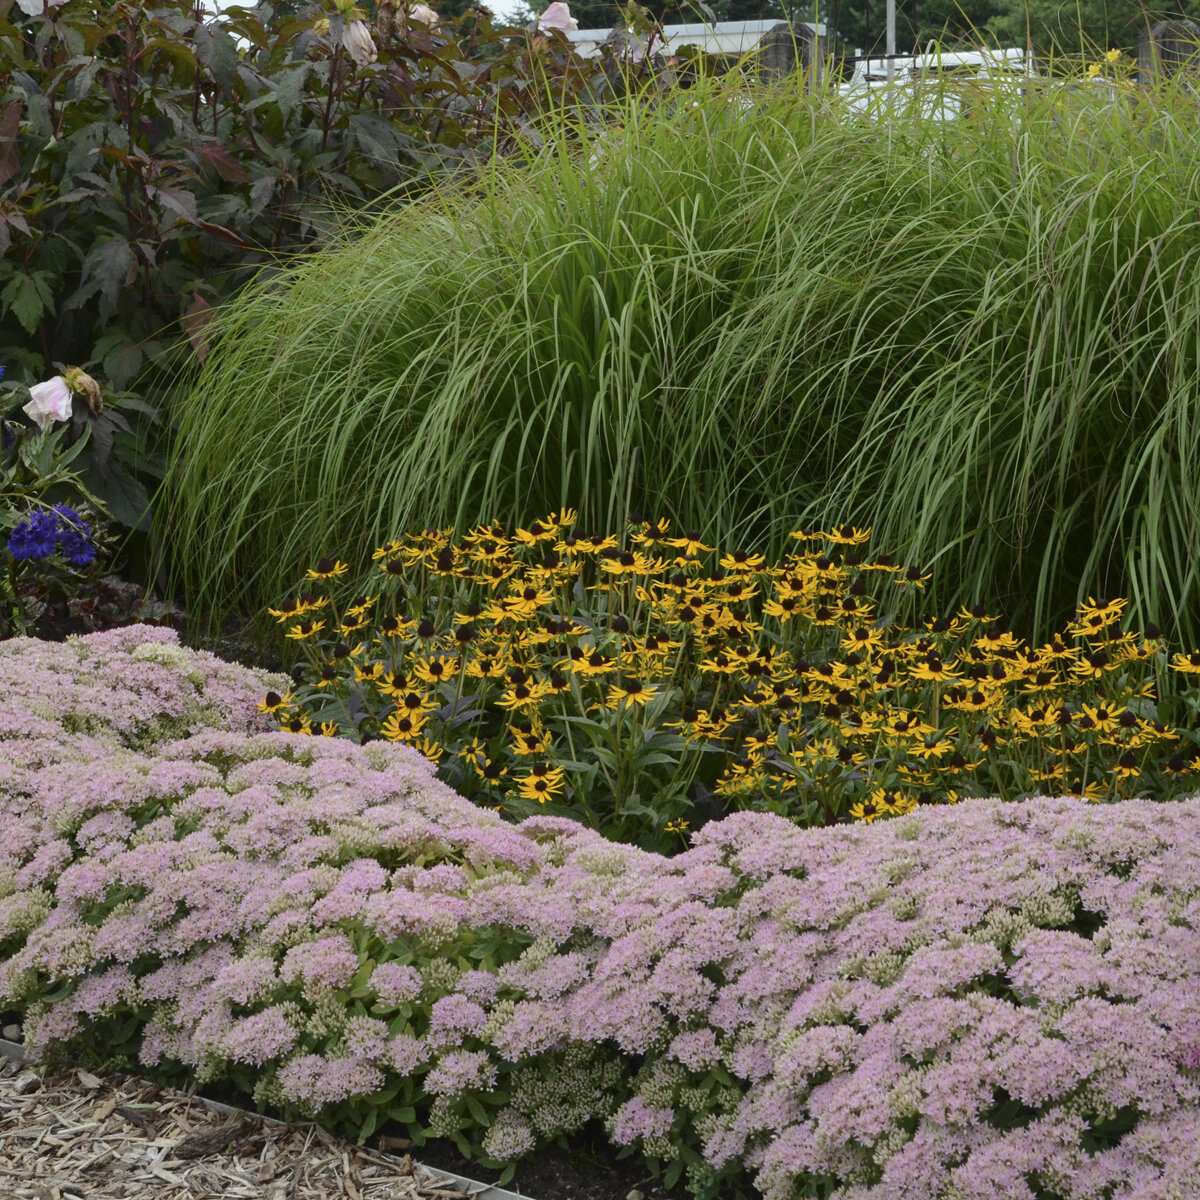
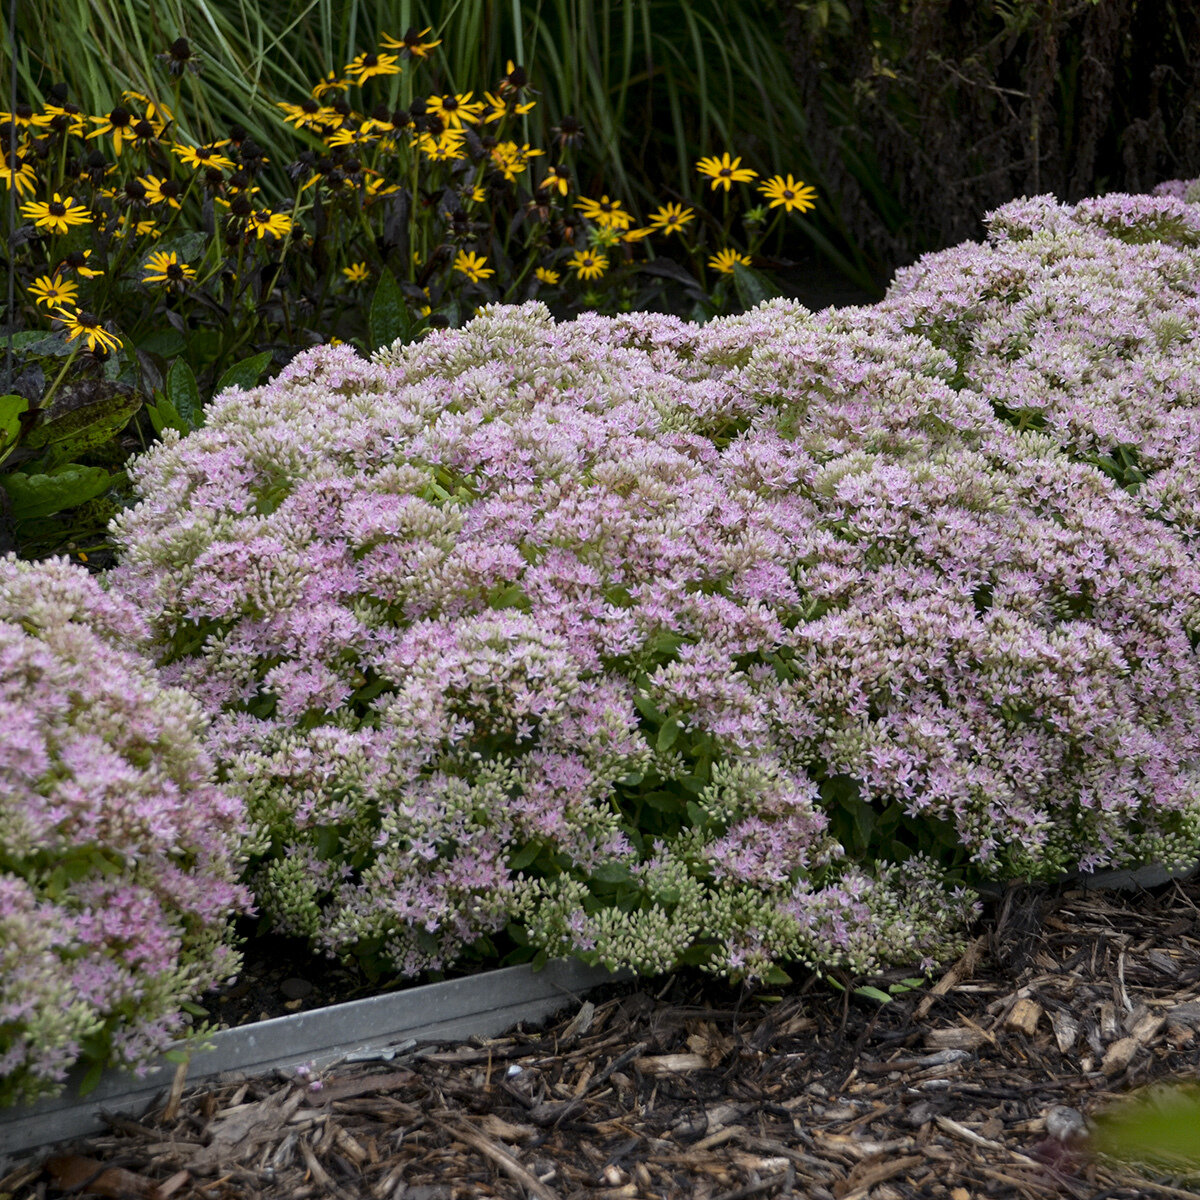
Sedum X ‘Pure Joy’ (Common Name: Stonecrop; Ground Cover Sedum)

This plant is a relatively new introduction in the ROCK 'N GROW®  series (trademark is owned by Walters Gardens, Inc.).

In spring, small serrated leaves emerge in a cool shade of blue green.  They form a perfectly rounded, low mound perfect for edging the front of the border.  As the plant matures through the season, the leaves expand and turned lighter green, forming a short, semi-upright clump. 

When ‘Pure Joy’ flowers in late summer and early fall arrive, the flowers form a massive dome of bubblegum pink,  completely covering the foliage.  Deeper pink seed heads follow later in fall. 

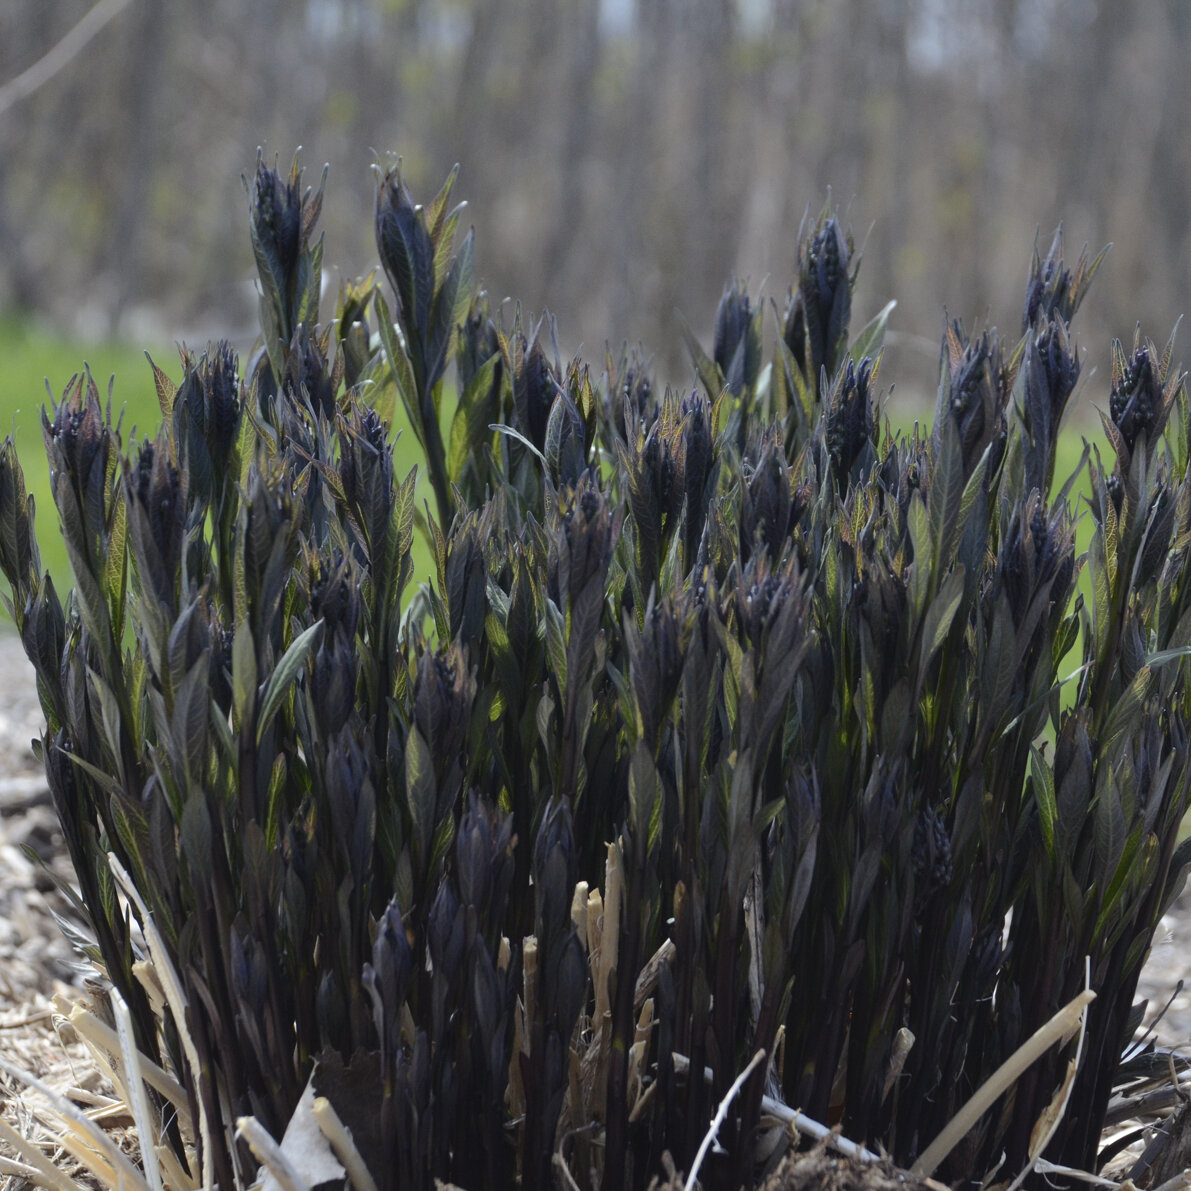
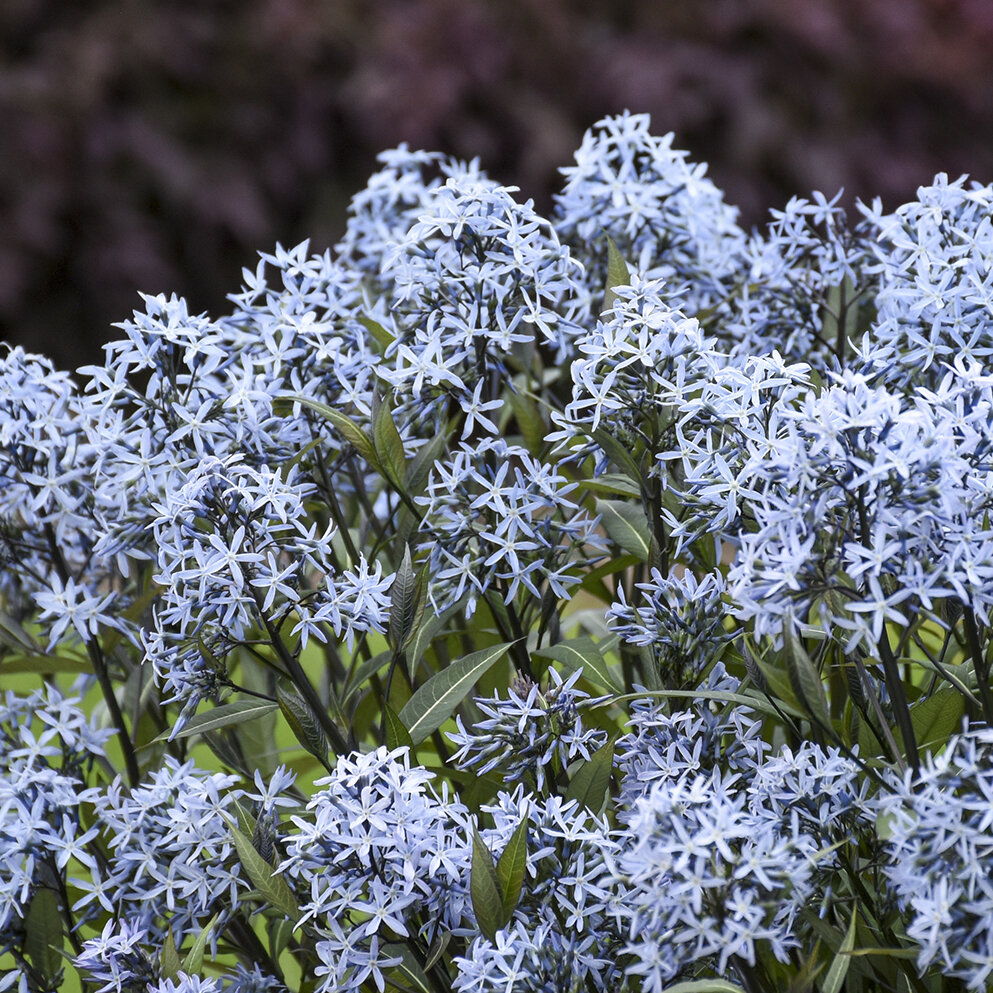
Amsonia tabernaemontana ‘Storm Cloud’ (Common Name: Bluestar)

Amsonia is the classic North American perennial, and ‘Storm Cloud’ is an improved selection that is worth planting for its black-asparagus sprouting stems in spring, if for no other reason.

New stems emerge in spring that are near-black with leaves that are very dark green with silver veins.  The stems stay dark throughout spring.  Light periwinkle blue, star-shaped flowers completely cover the foliage in late spring, and rebloom for many weeks afterward. Although the main interest of this plant is in spring, it maintains a great garden presence throughout the summer and fall.  Its wide, mounded habit lends itself well to be used in place of shrubs in the landscape.  

In the fall, it puts on a memorable show with shades of bright gold, red and copper.  It is easy-care, heat and humidity-tolerant and deer-resistant.  What more could you ask?!

Why do so many landscapes fail?

I’d like to share some of the wisdom of Linda Chalker-Scott. She’s famous for dispelling some of the long-held “myths” about plants and planting – and, if not dispelling them, certainly indicating whether there is really any good evidence to support them.  

LINDA CHALKER-SCOTT Horticultural Myths

Dr. Chalker-Scott is an Extension Urban Horticulturist at the Puyallup Research and Extension Center of Washington State University as well as an Associate Professor of Horticulture and Landscape Architecture at WSU.

You may know her from: The Blog

The Garden Professors™

 or her Podcasts: The Informed Gardener

or her Books, including “How Plants Work”

How Plants Work.jpg


In one of her presentations, she addresses that horrible, yet oft-asked question:

Why do so many landscapes fail?  And, in particular, why do so many newly-planted trees fail?

In her view, it all boils down to this – trees that fail have poor root establishment. Why?

I’ll give you the gist of her reasoning, then add my own tips.

Reason 1: Tree roots are already comprised when the plant is purchased.  So what can you do?

 Choose trees that:

• have heights appropriate to pot size

• are free from damage and disease

• have not been improperly pruned

• have a strong central leader (unless multiple leaders are natural for the species)

• have branches well-distributed along trunk

• do not have included bark


My First Tip: unwrap the burlap around the trunk; don’t be afraid to ask the nursery to pull it out of the row to let you have a closer look at it

My Next tip:  Try to ascertain whether the root ball has dried out during the time its been sitting in the Nursery, and ask directly if the tree is “left over” from the previous season.  If the root ball has dried out, it will be very difficult to “re-wet” it and you will have to pay attention to doing that before you plant.  If the tree has been sitting in the Nursery all summer, or since last year, it can still be OK but forewarned is forearmed.

My Third Tip: once the tree comes off the truck, have another look.  Is it the same one that you tagged?  If not, you can return it without any guilt (just call first).  Are there broken branches from loading and/or transport?  If so, prune away any damaged (or dead) branches right at the start – you’ll never have better access to the whole tree than when its sitting on the lawn all by itself.

My Last Tip:  make sure the burlap at the base of the trunk is cut away.  This can usually be done while still keeping the lacing intact in case the crew needs to use the lacing to move or rotate the tree during planting.  Try to get any idea of how far down the trunk flare is buried within the root ball, so that you can make as accurate as possible a measurement for the depth of the planting hole

And P.S. remove all the plastic tape from the branches and trunk while you can still reach it. Don’t leave tags on!

Reason 2: Improper soil management at the time of planting.  So what can you do?  The first thing is – do a soil test.

Urban landscape soils can be heavily compacted and/or have abrupt layers, creating perched water tables.  The soil that’s left after the site has been disturbed by construction does not necessarily resemble “native” soil types. Soils need to be tested before selecting plants or adding amendments.

Soil compacted by construction

Soil compacted by construction

Even if you’re working on a property where the plantings are already established and the soil is not “new”, you must still get a soil test.  And the soil can still be compacted, because trucks, pick-up trucks and equipment are not the only causes of compaction – compaction can result from foot traffic or erosion as well.

The results of compaction are reduced water and air movement within the soil, impeding root growth.  If tree roots can’t grow into the surrounding soil, then they can’t get enough air, water and food to support the growth of the tree, so it has to start using its energy reserves.  Newly-dug trees don’t have much of an energy reserve, since they’ve recently had up to 90% of their roots eliminated by the machine used to dig them.  So they can begin to enter a process of decline and they may drop their leaves to conserve water.

unnamed.jpg

The Chalker-Scott “first commandment” of soil management: 

Don’t Amend Soil that doesn’t need to be amended – too much fertilizer is bad/unnecesssary/expensive to the environment

One of Dr. Chalker-Scott’s Horticultural Myths is:  Why do folks think they should apply fertilizer always every year, every season?  She says: 

“this is a misapplication of agricultural practices to urban landscapes.”  In annual crop production, the system is predicated on annnual disturbance.  Vegetation is removed yearly, and the soil has to be amended on an annual basis.  

 In a “permanent landscape”, the soil is not disturbed annually (unless everything you planted dies!) and its not feasible to amend the soil after plants are installed, except by adding top-dressing of some kind.

My tip: Crops have to be fertilized in order to maximize their value as food sources within the limited time of a growing season.  Since crops are harvested, there’s little opportunity to recycle nutrients back into the soil (that’s why there’s crop rotation and cover crops are planted). Your landscape is not a crop!

Soil Tests:  Make sure you request the tests that you need to understand the properties of the soil you’re working with.  If you’re unsure, speak to someone from your chosen testing lab to help you figure out what you need.  Soil tests are in many ways geared toward agriculture – they tell you what nutrient levels are not optimal and recommend amendments which farmers can then incorporate into their fields.  For ornanental horticulture, the information you need includes how much organic matter is in the soil, as well as what the nutrient levels are and whether there are any “bad” things in the soil, like salt or heavy metals.

If your soil test comes back with high nitrogen levels and the recommendation is NOT to add any nitrogen, this will alert you that plant problems that your site is experiencing can’t be fixed with fertilizer.  So you’ll have to start looking for other causes for poor plant health - soil compaction, over- or under-watering, too much or too little sun for the plants that are there, overcrowding, nutrient overload, improper grading, too much mulch, planting too deep etc.

You should be aware that “more” is not always (or maybe never is) “better”

Dr. Chalker-Scott says:

  • Ideal soils, from a fertility standpoint, are generally defined as containing no more than 5% OM by weight or 10% by volume

  • Know your soil test results

  • Be conservative with organic amendments; add only what is necessary to correct deficiencies and maintain OM at ideal levels 

  • Do not incorporate organic amendments into the soil of planting beds destined for permanent installations, unless tests show less than 5% OM; topdress with mulch instead

  • Abnormally high levels of nutrients can have negative effects on plant and soil health

  • Any nutrients not immediately utilized by microbes or plants contribute to non-point source pollution

The second thing you can do: don’t plant too deep (or too high unless you smooth the grade around the tree or create a berm). 

Planted too low

Planted too low

Planted too high

Planted too high

This is in many ways one of the most difficult things to do, because the methods and procedures for growing trees and digging them inevitably result in soil being piled up over the root flare.   You have to be diligent to remove as much of this excess soil as possible during planting.  Sometimes you’ll be disgusted by how much soil you have to remove.  And sometimes you’ll have to insist that the crew remove this soil because they may not understand how important it is.  The more of an idea you have of how much soil has to be removed before you put the tree in the hole, the better, because there’s nothing worse (or often more impossible) than asking the crew to take the tree back out of the hole!

My Tip: Don’t ever ask the crew to take a tree that took multiple guys to move back out of a hole! First of all, it can’t be done. They slid it into the hole but they would have to lift it out - only a machine can do that. Learn how to figure out how to place trees before you start digging - use a pole or a person to “be the tree” then look from every possible angle.

seedling-planting-b_orig.gif

Look for the root flare

BareRoot3_000.jpg

Kid’s have the right idea: trees flare out at the bottom, so kids draw them that way. Trees should not look like telephone poles coming straight out of the ground.

Kids Tree.jpg
A telephone pole orchard

A telephone pole orchard

The third thing to do is to determine whether the soil is compacted.

You can often tell by looking. Or trying to dig. Or noticing standing water after it rains. Feel it; determine its texture. If you need to, you can do a simple percolation test - information available on the internet tells you how to do this. Also, think about what was in the area before, notice whether there’s evidence of recent construction work or whether this area was the “construction road” that the contractors used when they were building the pool.

The best method for de-compacting soil is controversial and definitely depends on the size of area you’re working with.  If its a large area and you’re starting all over again, then maybe the “scoop and dump” method invented by Nina Bassuk will work. This is a link to her method:

http://www.hort.cornell.edu/uhi/outreach/pdfs/scoop-and-dump-short.pdf

If its a relatively small area, then loosening the soil can often help.

In any event, you’ll need to decide how to improve the soil over the long term. Maybe you plant the area with a type of ornamental grass that has deep roots that can penetrate compacted soil.

My tip: Used raised beds and/or berms so that you can add enough new soil on top of the compacted soil to support plant growth (12 - 18 inches will work; even less sometimes).

The fourth thing to do: top-dress with organic mulch

manure jpg.jpg

Linda Chalker-Scott says:

Organic mulches will:

- provide a slow release of macro- and micronutrients 

- improve soil structure by reducing compaction and allowing aggregates to form 

- enhance establishment of trees and shrubs in low-maintenance landscapes 

- enhance beneficial microbes, which can outcompete pathogens if soils are healthy 

- enhance soil macrofauna biodiversity

My First and Most Important Tip: Learn to mulch properly around a tree!

NO! Mulch should never be piled up around the trunk like this - why do people do this???

NO! Mulch should never be piled up around the trunk like this - why do people do this???

YES! A beautiful, smooth, flat skirt of mulch around a beautiful tree. It protects the entire root zone of this mature tree and looks neat and clean; easy to maintain; no need to attempt to grow grass underneath.

YES! A beautiful, smooth, flat skirt of mulch around a beautiful tree. It protects the entire root zone of this mature tree and looks neat and clean; easy to maintain; no need to attempt to grow grass underneath.

My Next Tip: If you’re buying mulch in bags, I recommend Coast of Maine products like Dark Harbor Blend Enriching Mulch. You get what you pay for in mulch (as well as in most other aspects of life). If you’re buying in bulk, get to know your supplier and understand how the mulch is made and where it comes from so that you can trust its quality. Or at least purchase “premium mulch” from the wholesale nursery.  

 My Third Tip: if bulk mulch stinks when you load it on the truck, think twice.  To quote the child of one of my clients: “It used to smell pretty good around here until you guys showed up”

 My Fourth Tip:  Weed the garden, remove debris and rake out the beds before you mulch.  Sometimes just raking looks fine and you might not need to mulch.  Especially if you’re trying to get “living mulch” groundcovers to spread.

My Next Tip: Only add mulch once per year - I recommend late spring or early summer, because a lot of the weeds have sprouted by then so you really clean up the garden effectively before mulching. Also, you can see “holes” in the design by then and add plants to fill them before mulching.

 Another tip:  Don’t mulch in March!  Or even early April.  Many of the perennials haven’t started to come up and you will suffocate their crowns – then poof! - no more perennials!

And this is not a tip, it’s a mantra:  The purpose of winter mulch is to keep the ground frozen.  Ergo, don’t mulch until the ground is frozen.  (Good luck with that; some winters these days the ground doesn’t freeze until after the crews have stopped working). The worst thing you can do to a landscape in late fall is to violently blow away all the leaves, and with them a lot of the mulch that you put there a few months before, then add 3 inches of fresh mulch. Yes, the client may tell you they want their garden beds to look “clean”, but its your responsibility is to come up with a design and planting plan that always looks “clean”.

This?

This?

Or this beautiful layered planting done by Thomas Rainer: Planting in the Post-Wild World

Or this beautiful layered planting done by Thomas Rainer: Planting in the Post-Wild World

Get Outside and Play! The benefits include balance, confidence, climbing, strength, overall fitness and fun

xBenefits-of-outdoor-play-Lars_Plougmann-ccbysa2-cropped-320x.jpg.pagespeed.ic.9g74ov4vkS.jpg

Kids need to be connected to nature for their well-being and to learn resilience. There have been many studies that show that being outside brings a mental sigh-of-relief to most people, including kid’s. Its a way to de-compress. To just be with yourself for a minute. Kids also need to play - it’s how they learn physical skills, learn to use their imagination and get their excess energy out.

In some of my Design Concepts for young families I suggest what I call a “Kid’s Adventure Pathway” - a way for kids to “run around the yard” in a space designed for them, without interfering with “the grown-ups” or wrecking the lawn. The Adventure Path allows kids to explore the “wilder” parts of the yard - it may even be partially screened by some of the plantings. Since its theirs, they can contribute to the design, decide what they think would be fun, and even collect stuff to add to it (like a birch log from a hike that they might take with Mom and Dad or a teepee made from gathered sticks).

The Kid’s Adventure Path can also be an opportunity for practicing physical skills, so why not incorporate an obstacle course into the Adventure Path? You can take some of the elements of a “real” obstacle course and re-invent them. Depending on where the path ends up being located, you can use these obstacle course-like elements as part of the way to get from A to B. If the path goes up a hill, use a ladder element. If the path goes over a swale, use a balance bridge. If the path goes down and then up again, build a zig-zag bridge across it as an alternate way to get there.

Obstacle Course

Different elements of an obstacle course train different physical skills

Different elements of an obstacle course train different physical skills

Obstacle course elements provide real fitness training as well as play.  You can play on any part of the course individually depending on your mood. Kids can time their performance and improve over time. Or they can use it to compete with their friends. An obstacle course can be a group activity or an individual activity - most of all, they’re fun!

Elements can be constructed as “DIY” project or by a good carpenter/contractor. Logs are a great element to use, since logs can often be gotten free from tree companies who are working in the area. If you ask, they will often cut the logs into different sizes for you.

children-climbing-among-logs-julie-howden-wtml-580x435.jpg


Typical components of an obstacle course made to be “kid-friendly”

Here are some examples of “natural” ways you could create obstacle course elements – emphasizing balance, confidence, climbing, strength, overall fitness and fun.

PictureX.jpg
Picture3.png
Picture1.png
Picture4.png
Picture5.png
Picture6.png
5d08f5fea9716.image.jpg
Log Stepping Stones.jpg

String some ropes and let them make their way through a maze

Picture7.png

Slackline

… seems to be fun and accessible to all ages – you just need some trees.  Slacklines could be installed as a way to get from one location to another within the back yard.

Picture9.png
Picture10.png
Picture11.png

Add a music and noise-making wall or suspend a hula hoop decorated with ribbons 

Picture16.png
Picture18.png

Wrap some fallen branches in yarn to use as totems

Yarn wrapped sticks22.jpg

And, for the ultimate adventure …. Zip line!

Picture111.png
Picture112.png
Picture113.png

Planning for Planning a Back Yard “Orchard” - Choices for small-ish fruit-bearing trees to plant in the back yard

Small orchard.jpg

Not many of us have the space or sun/shade conditions for a real orchard. But even if you don’t actually plant an orchard, fruit trees can fit into a plan for a back yard garden.

Qualities for Backyard Orchard Trees

  • Mature size – they should be either shrubs or small trees so as to not end up shading out the garden

  • Easy to maintain – this includes pest and disease resistance, as well as requiring as little intricate pruning as possible. No requirement for pesticides.

  • Not too fussy about soil type

  • At least some of them able to tolerate a bit of shade

  • Cold-hardy yet not requiring more chill-hours than we have at this point in the climate change process (we’re Zone 7b now). Tolerant of summer heat.

  • At least some of them native if possible

  • Self-fertile if possible

  • Having as much ornamental value as possible, including spring blooms and beautiful fall color

  • Suited to a “hedgerow” look at the back and sides of the vegetable garden, rather than a more formally laid-out orchard


    (Add to these requirements that the trees should be deer-resistant if that is an issue.)

Corneliancherry dogwood (Cornus mas)

Cornus mas in bloom early spring

Cornus mas in bloom early spring

Corneliancherry is one of the earliest small trees to bloom in the spring – often even before the first day of spring.  Its yellow flowers and strong branching habit add excellent ornamental interest.  The yellow blossoms are small but borne in such profusion that the tree appears swathed in a yellow veil.  The blossoms last for weeks and do not seem to be harmed by frosts.  Those blossoms are followed by satiny green leaves that turn mahogany red in fall.  In winter, the bark flakes off in eye-catching, muted shades of tan and gray.  It can tolerate partial shade, and is a small tree, growing to 10 – 15 ft tall.

 The fruit ripen from midsummer onward and are generally cherry size and fire-engine red with a single pit, just like real cherries.  Though tart when just ripe, they mellow in flavor after a few days either on or off the tree.  Fruit is suitable for jellies, preserves, and making wine.  For proper pollination, two or more should be planted.

cornus mas fruit.jpg

American persimmon ‘Meader’ (Diospyros virginiana)

American persimmon is a deciduous, native tree with a rounded oval crown that grows to about 20 ft tall and 15 ft wide.  It is one of the easiest trees to identify in winter because of its distinctive thick, dark gray bark that is broken into rectangular blocks.

American persimmon is gorgeous in autumn!

American persimmon is gorgeous in autumn!

 It blooms in May-June with fragrant white to greenish-yellow flowers.  It tolerates full sun to part shade, and is drought tolerant once established.  ‘Meader’ is a self-fertile cultivar with superior ornamental qualities.  Its dark green foliage is attractive throughout the growing season before turning excellent shades of red and yellow in fall.  The edible, apricot-sized fruit (to 2” diameter) ripens in fall to an orange to reddish-purple color, and may persist on the tree into winter.  Persimmon fruit is quite astringent when green, but upon ripening becomes sweet and may be eaten off the tree.  Fruits are commonly used in syrups, jellies, ice creams or pies.  Persimmon leaves can be used to make teas.  Persimmon is a member of the ebony family. 

Pawpaw (Asimina triloba

Pawpaw is native to North America, growing wild in much of the eastern and Midwest portions of the United States.  The foliage is the sole food source for the Zebra Swallowtail Caterpillar, and the butterflies are attracted to pawpaw trees as a result.  Deer, on the other hand, are not interested in eating the leaves of pawpaw trees.  The trees produce tropical-like fruit with unique and delicious taste said to be like a mix between a banana and a pear, with a hint of vanilla.  Because Pawpaw requires cross-pollination, more than one variety needs to be planted.  

 Pawpaw fruit helped sustain Native Americans and early American settlers in times of harvest failure.  They need little maintenance in order to survive in the wild, unlike apple, pear, or peach trees.  Thanks to its resilience, Native Americans and early pioneers enjoyed pawpaw fruit as a dependable source of fiber and nourishment.  Even members of the Lewis and Clarke Expedition survived on pawpaw fruit during their long journey west in 1804-1806.

Pawpaw seedlings

Pawpaw seedlings

When Pawpaws first became a bit more broadly available in the Nursery trade, there were not “named varieties”, so the only thing to do was to buy a number of seedlings, plant them all, and see which had the best fruits. At this point, though, cultivars can be purchased with “known” fruit properties.

Wells Pawpaw: Delectably fruity, banana-like flavor.  Pyramid-shaped tree provides ornamental beauty with unique dark-purple flowers in spring and tropical-looking foliage through fall.  Fruit has green skin with a slightly orange flesh and a creamy custard texture.  High in protein, vitamins, and minerals.  This tree prefers partial shade. Fruit ripens in September.  Grafted. For proper pollination, plant another pawpaw variety.  It takes about 3 – 5 years to bear fruit.

 Sunflower Pawpaw: Delicious 3-6" fruits.  This reliable and productive variety offers pawpaws with greenish yellow skin, buttery flesh and only a few seeds.  Fruit has a creamy, banana custard flavor.  Tree bears in just 2-3 years!  Fruit ripens in late September to early October.  Grafted. For proper pollination, plant another grafted pawpaw variety.

Asimina trilby has distinctive, large leaves that look almost tropical, and a distinctive habit as well.

Asimina trilby has distinctive, large leaves that look almost tropical, and a distinctive habit as well.

Medlar (Mespilis germanica)

What is a medlar, you ask?  Mespilus germanica is a small deciduous tree and member of the rose family.  The fruit is smallish, ranging from about 1 to 2 inches in diameter, and ranging in color from rosy rust to dusty brown.

Mesphilus fruit looks like rose hips

Mesphilus fruit looks like rose hips

Medlars are native to Southwestern Asia and Southeastern Europe.  They were enjoyed by the Greeks and Romans, doted on by Victorians and mentioned by Shakespeare.  They’re almost unknown in the U.S. today.  They bear unusual fruits that have to be eaten when “almost rotten”–a process properly called “bletting”.   But there is a difference between rotting (which makes a fruit unpalatable) and "bletting", the softening process which turns a medlar's tartness to sugars.  The flesh becomes a creamy (albeit brown) puree.  When they’re ready to eat, they’re brown, squishy, a little wrinkly.  (Not too attractive).  Because medlars have to be eaten when bletted, they either have to be eaten right off the tree, or they have to be picked early, then put aside for a few weeks to blet.  Then, when they’re finally bletted, they should be eaten immediately.  

 The fruit is sweet, slightly citrus, with overtones of stewed apples.  People describe them as being delicious - holding delicate notes of cinnamon, vanilla, cider, or wine.

The tree is self-fertile, so you only need one, and is particularly free of pests and diseases.  Once the formative shape has been created in its first years, regular pruning is not needed.

Flowers …

Flowers …

… and fruit

… and fruit

The medlar tree has a lovely spreading, almost weeping habit and grows to about 15 ft tall.  Medlars will do well in most soils, so long as they're not badly drained.  Strong winds can damage the flowers, so it's best to ensure they're not too exposed.  They will tolerate partial shade – can still produce fruit in an overshadowed, east-facing bed that only receives sun for a couple of hours a day.

Medlar habit with spring flowers

Medlar habit with spring flowers

Medlar fall color with maturing fruit

Medlar fall color with maturing fruit

Here’s what one medlar enthusiast says about eating them:

“What you definitely don't get is a lot to eat from each medlar (they contain several fairly chunky seeds) and my favorite way is to eat them is to scoop the flesh straight from the fruit with a teaspoon.  It makes a delicacy with wine, port or cheese. … Adding it to breakfast yogurt is something of a treat.  Medlars are probably best known, however, for being made into a jelly or cheese, when the fruits are stewed whole and passed through a sieve. You'll need a fair number to make more than a small jarful, but the fun will be in getting your friends to guess what it is.”

Medlar02.jpg

Jujube (Zizyphus jujuba)

Jujube, also know as Chinese date, is native to China and has been grown and enjoyed for over 4,000 years.  They are interesting trees with spiny, gnarled branches and an open, irregular form.  The mottled bark is rough and shaggy.  Glossy green leaves turn yellow in the autumn.   Jujube grows in a wide range of soil types and pH ranges, but good drainage is required.  Once established, they are drought resistant and virtually pest and disease free.  Jujube has a moderate growth rate reaching about 20 ft tall and 15 ft wide at maturity; it can also easily be pruned to maintain a more compact habit.  Hardy in Zones 6 – 10.

 Jujubes require only 200 to 400 hours of winter chilling (hours below 45 degrees) to fruit.  Once established, jujubes need a total of only 20 inches of water a year for good fruiting.  Jujubes do not tolerate shade well. They prefer full sun but need little fertilizer.   However, the fruit and foliage may be eaten by deer.

jujube_2.jpg

Jujubes, which are self-fertile, are very productive and early bearing.  Eaten either fresh or dried like dates, the fruits are quite sweet.  Even young, two-year-old trees are able to produce these delectable treats but be forewarned that these fruits can create quite a litter problem.  Locate the tree so the fruit drops in a mulch bed or on the lawn, not on a sidewalk, patio or driveway. 

ziziphus-jujuba-tree-lang.jpg

In June (after the threat of a late frost), small clusters of whitish-yellow fragrant blossoms appear (they smell like grape soda), hidden in foliage between the leaf and stems.  The one-inch-long green fruits ripen to dark red and finally black.  The fruit needs hot summers to ripen well.  There are three color stages of fruit development: the green stage when they are growing, the yellow-green stage when they start to ripen and the red-brown stage of full ripe fruit.  Jujubes can be eaten at the “crisp mature” stage when the fruit is full size and skin has changed color to partially reddish-brown.  At this stage, the flesh is still crisp and is very sweet.  Alternatively, the fruit can be eaten at the “fully mature” stage, after the skin color changes to fully red and is wrinkled.  At this stage, the flesh is very sweet but drier – like a date.

 Though jujubes had been brought to the US from Europe, they were not considered to be very good.  “Improved” Jujube varieties were discovered in China and brought into the United States by USDA discoverer Frank Meyer in 1908.  The USDA propagated several varieties, including better varieties for fresh use:  'Honey Jar,' 'Sugar Cane,' 'Li,' and 'Shanxi Li' –these ripen in early September. 

 Jujubes taste like a very sweet apple when eaten fresh; when dried, jujubes truly taste like a date. The fruit, when processed into jujube butter, was rated better than apple butter by the people at Texas A&M, some years ago. 


Got Geese?

I recently read something about the biology and ecology of geese that could be important to understand when thinking about “managing” them in open spaces – especially what contributes to the overabundance of geese and why its so hard to scare them away.  

 In the first half of the 20th century, Canada geese were captured and used as live decoys in the hunting of migratory geese populations.  They had their wings clipped, so they couldn’t return to Canada and ended up breeding here to contribute to a population of “resident” geese.  By the 1960’s, hunting threatened the migratory Canada geese population with extinction and the resident flocks were mostly gone.  To counter this near extinction, the US Fish and Wildlife Service and many State wildlife agencies began a program of re-population of wild Canada geese.  Like many “be careful what you wish for” situations, the program was super effective and by the early 1990’s this re-population effort was halted because it resulted in large resident geese populations in cities and suburban areas.

 Unfortunately, the geese born as a result of the Canada geese repopulation effort do not have the imperative to nest in Canada since they were born here.  Since geese return to the area where they were born to nest, and also mate “for life”, the population of geese we’re dealing with in our parks are essentially “residents” just like us.  That’s why it may seem that geese “don’t seem to migrate anymore”.

 Resident Canada geese nest in the early spring and have their goslings in May.  

Goslings

Goslings

After nesting, geese undergo an annual "molt", a 4-5 week flightless period when they shed and re-grow their outer wing feathers.  Molting occurs between mid-June and late July, and the birds resume flight by August.  Geese need a “safe” location to molt- generally is an area which has a water body for sanctuary (they can’t fly but they can still swim and their strategy is to flee into the water to escape predators) and nearby grass for food.   Ouropen spaces are often the perfect habitat for molting.  Goslings can’t fly either until mid to late August.  

This means that geese and goslings are biologically “trapped” in the area where they nested, were born and/or molted because they are flightless – they can’t leave until early to mid August when they are able to fly again.  This is why it seems that no matter what we do to try to scare them away they don’t leave - in fact, they can’t!  Unfortunately, this period coincides with the start of the spring active outdoor activities and continues into summer vacation times when people are outside.

There are a number of different ways to “deter” geese, but most don’t work.  Some of the best “ecologically-based” methods aren’t feasible for most open spaces – like replacing turf lawn with tall grasses (geese forage on mowed lawns). Vegetated shorelines are unattractive to geese because they can’t see potential predators when swimming and they can’t quickly access the water from the land, so wildlife biologists recommend planting water edges with native riparian vegetation like willows, sedges, and rushes.  But obviously we can’t do that everywhere.

Canada geese1.jpg

One approach is treating the grass so that it is unpalatable to the geese and forces them to go elsewhere to find grass to eat.  This approach could deter young geese and geese without goslings from choosing our parks as a safe location for molting, and maybe even deter nesting.  

 Two chemicals are approved for use by the Food and Drug Administration as Canada goose repellents: methyl anthranilate (MA) and anthriquinone.  MA is a non-toxic taste aversion agent derived from grapes.  Treatment of vegetation with MA makes it unpalatable to Canada geese.  MA is safe for human consumption, so it can be used on crops where necessary.  Products with MA as the active ingredient include RejeX-it®, Bird Shield®, Goose Chase™, and Fruitshield.

 Anthriquinone acts as both a taste aversion agent and a visual deterrent.  Vegetation treated with anthriquinone changes color within the ultraviolet portion of the spectrum (birds can detect ultraviolet colors).  This color change alerts Canada geese that this vegetation is unpalatable, and they will avoid it.  Anthriquinone is the active ingredient in the product Flight Control®, and it is considered non-toxic when applied in accordance with the manufacturer's guidelines. www.flightcontrol.com


Wouldn’t it be awesome if spraying a repellant on turfgrass areas actually helped!


Rain Garden Effectiveness - Data Collected Over a 4 Year Period in Cincinnati OH

I recently read an article from a journal called “Infrastructures”

To quote from the website:

Infrastructures (ISSN 2412-3811) is an international scientific peer-reviewed open access journal published quarterly online by MDPI. MDPI has supported academic communities since 1996. Based in Basel, Switzerland, MDPI has the mission to foster open scientific exchange in all forms, across all disciplines. Our 203 diverse, peer-reviewed, open access journals are supported by over 35,500 academic editors. We serve scholars from around the world to ensure the latest research is freely available and all content is distributed under a Creative Commons Attribution License (CC BY).

The important point is that the article was peer-reviewed, so one can have confidence that their methods and data analysis are in line with current accepted standards.

The article is entitled:

Factors Contributing to the Hydrologic Effectiveness of a Rain Garden Network (Cincinnati OH USA)

Authors: William D. Shuster, Robert A. Darner, Laura A. Schifman and Dustin L. Herrmann

The authors are scientists and post-docs from the EPA National Risk Management Research Laboratory and a hydrologist from the US Geologic Survey Michigan-Ohio Water Research Center.

Why did I read this article – I found it using a Google search meant to find studies of the effectiveness of rain gardens. Once I saw the system they had studied, I knew I had to somehow get through this article, even though my hydrology knowledge can fit in a drop of water. I’m not saying I understood everything in the article, so basically I’m going mostly by the authors’ summaries and interpretations of their data.

The project described in this article was at the St Francis Court Apartments in Cincinnati and was part of a city-wide effort to add green infrastructure to their parks system.

The project described in this article was at the St Francis Court Apartments in Cincinnati and was part of a city-wide effort to add green infrastructure to their parks system.


The focus of the paper was on infiltrative rain gardens – these are stormwater management practices meant to allow stormwater runoff to be redistributed back into the water cycle, while also detaining excess water so that its entry into the public stormwater system is delayed (thereby not exacerbating peak flow into the system).

I have long hoped that these practices would be used more widely in suburban residential and commerical development, especially infill development – the only kind of development left in most places around where I live. Right now, the “accepted” standard is to dig gigantic holes and bury large plastic chambers with open bottoms (often referred to as Cultechs) which accumulate the stormwater and allow it to infiltrate into the ground underneath and around the chamber. While this is definitely better than allowing the stormwater to go directly into the sewer system, directly into streams, lakes and rivers, or directly onto the neighboring property, it doesn’t allow for evapotranspiration and doesn’t support plantings. In other words, the water is buried - it doesn’t re-enter the water cycle as it would naturally. I have often wondered who decided, and why, that trying to infiltrate stormwater into the subsoil that is present when you dig a 5 foot deep hole should become an “accepted” practice. No offense to engineers, but they need to start thinking outside of the Cultech.

Whenever I’ve broached this subject of encouraging – yes, even requiring – landscaping (aka green infrastucture aka rain gardens) as part of the overall stormwater management practice in new development, it is said by folks like heads of Building Departments or Village Engineers that “rain gardens don’t work”. So I’m trying to find hard data that evaluates whether they work or not, and what factors affect their ability to infiltrate and detain stormwater.

General elements of a rain garden

General elements of a rain garden

Just a quick reminder of what we’re talking about – the term “rain garden” tends to mean different things to different people. In Stormwater Management Guideline-speak, it would be referred to as a Bioretention Cell.

A bioretention cell (rain garden) is an excavated area that is filled with a specialized soil media and plants. It is designed to temporarily store runoff volume in ponding areas, engineered rooting zone soils and gravel-filled underlayers. Rain gardens can re-direct excess water into other areas of the landscape, and rain garden vegetation returns water into the water cycle via evapotranspiration. Rain gardens are among the most versatile green infrastructure stormwater management practices: They can be installed in a variety of soil types from clay to sand and in a wide variety of sites. They are also quite effective for removing pollutants through a variety of different mechanisms, including infiltration, absorption, adsorption, evapotranspiration, microbial action, plant uptake, sedimentation, and filtration. Their overall goal is to combine infiltration and storage processes to manage at least the smallest and most-frequent storms.

Some important common elements of every rain garden practice:

• The garden is an excavated space that is filled back up with a specialized well-draining soil mixture.

• The space is shaped like a saucer – i.e. it has slightly bermed-up sides all around it so that the middle can fill up with water when it rains

• The depth and square footage of the garden, as well as those of the gravel layer underneath and the ponding area, are calculated based on the amount of rain to be expected versus the rate at which water can infiltrate into the underlying native soil beneath the special soil mixture. In other words, if the underlying soil drains slowly, the depth of the “holding” area needs to be larger. The math is a complex function how much water is coming in versus how much is draining out during the rain event. Eventually the rain will stop, so the underlying soil drainage rate will determine how long there will be standing water the garden. Luckily for us, there are computer programs that model this dynamic process, so you can change sizes and depths to accommodate the needs of your specific site.

• There needs to be a controlled overflow area that is defined within the design in case more rain enters the “holding” area than it can accommodate. Overflow from the rain garden should be directed onto a flow-attenuating surface– eventually this overflow may enter the storm sewer system directly or indirectly.

• The planted surface is covered with a fairly substantial layer of mulch – 3 inches or so – and the type of mulch used is important because you don’t want it to float away or wash away. The mulch is an important component because it prevents weeds as well as helping to retain soil moisture (since most of the time the soil in a rain garden will be dry). The mulch layer also protects the special rain garden soil from getting contaminated with mud or silt that might be present in stormwater runoff.

• There is generally a defined inlet into the rain garden – often a downspout extension is directed into the space or it may receive surface flow (or both). Wherever stormwater enters the garden there should also be some sort of flow attenuation mechanism to keep erosion within the garden to a minimum.

• There are obviously lots of other design considerations for rain gardens that you want to be ornamental and not just for mall parking lots. Like the space should be shaped so that water flows into the deepest parts first so that it is maximally effective. And often dry river beds are incorporated into the design so that when its “empty” it still has some structure. Sometimes weirs are also included to increase the ponding volumes and to manage sloped areas.

• When done well, a rain garden becomes an element of the landscape design that contributes to the overall beauty of the space as well as allowing stormwater to re-enter the water cycle in a natural manner without causing erosion or flooding the neighbor’s yard.

Each water-managing element contributes to the overall effectiveness of the rain garden. For example, the selection of rooting zone soil is a key part of the rain garden design process, as it regulates the movement of runoff volume into the gravel drainage layer. If the material is too permeable, retention time is short, possibly leading to immediate outflow conditions and adding to the stormflow burden in the sewer system. Alternately, if the soil profile has low permeability, then drawdown times are increased, predisposing the rain garden to an overflow condition.

Due to mulching and washing through of organic matter and soil particles, and development of soil biotic communities, the soil profile in a rain garden is in a constant state of development, influencing soil hydraulics.

Plants are integral to the success of rain gardens because their roots improve soil structure, thereby increasing infiltration rates. Plants used in rain gardens must be able to withstand widely varying soil moisture conditions, since rain gardens are often dry for long time periods, punctuated with periods of temporary standing water.

Back to the Research Paper

For this particular article, the authors followed a two-tier rain garden practice in Cincinnati OH for 4 years.  The greater Cincinnati area has a humid continental climate pattern with approximately 40 inches of precipitation annually and average daily high temperatures of 28 degrees F in January to 75 degrees F in July.

Cincinnatti Rain Garden.jpeg

Description of the site and rain garden network: Note that in many ways this site is the worst case scenario for building a rain garden.

• The area made into an infiltration garden used to be an asphalt parking lot associated with a residential apartment complex

• It is a two-tier system that receives run-off from a hillslope

• It accepts runoff from a roadway drainage system, from the forested hillside and from the asphalt parking lot at the southern end of the catchment

• All of these flows combine and are piped to an inlet in the upper rain garden. As runoff volume fills the upper rain garden, if storage capacity in the upper rain garden is filled, the excess drainage volume is conveyed to the lower rain garden.

• If the capacity of the lower rain garden is exceeded, excess drainage volume is conveyed to the centralized combined sewer collection system that runs along the adjacent street

The rain garden system was built fall 2010 to spring 2011. It consists of of an upper rain garden (4,300 sf) and a lower rain garden (3,200 sf), and drains an area approximately 96,875 sf (2.2 acres) in extent. Each garden is bermed at its borders with the perimeter in turf slopes. This creates a bowl shape that has considerable surface storage capacity of ~9,430 cu ft and ~8,475 cu ft, for upper and lower gardens, respectively.

The rain garden soil profile is composed of a 2 – 4 inch surface layer of chipped hardwood mulch placed over a 16-24 inch layer of engineered soil (texture: loamy sand in the upper garden, sandy loam in the lower garden)

The drainage layer is 14 inches of #57 gravel aggregate wrapped with a geotextile fabric

The native soil under the gravel is a very-slowly permeable, cohesive silty clay subsoil with trace shale parent material and limestone fragments.

Each garden includes PVC pipe underdrains that are wrapped in geotextile fabric and bedded into the gravel layer, and routed to drop box junctions. The upper garden drainage is conveyed along a pipe to the lower garden inlet. Lower garden underdrains are routed to its own drop box, and flows from this box are conveyed to the city combined sewer collection system.

Each garden was planted with generalist (drought- and flood-tolerant) perennials and grasses (plant list shown at the end).

This is an image I found on the internet on the website of a local newspaper taken in 2016 that I think helps to understand the site a bit better. This photo is taken from above the upper garden looking down to the lower garden. The city installed a…

This is an image I found on the internet on the website of a local newspaper taken in 2016 that I think helps to understand the site a bit better. This photo is taken from above the upper garden looking down to the lower garden. The city installed a curving path between the two levels to help folks navigate the space. At the bottom, you see the residential street, as indicated at the bottom of the diagram shown above.

Summary of Key Findings:

Based on 233 monitored warm-season rainfall events over 4 years, nearly half of total inflow volume was detained, with 90 percent of all events producing no flow to the combined sewer.

Conclusion: 90% of all rainfall events were fully detained in the gardens

For a storm event that drove the rain gardens to release flow to the sewer system (10% of all events), we found that the flows into the local combined sewer system were delayed off-peak for an average of 5.5 h.

Conclusion: when rain garden capacity was exceeded, peak flow into the sewer system was delayed to avoid adding to the immediate burden on the sewer system cause by the rainfall event

Table 3.jpeg


With the exception of areas immediately around the inlets, the initial plantings quickly established in the construction phase from 2011–2012, with canopy coverage in 2016 (4 years in to the operational phase) estimated at 97%. Although the thick surface mulch layer likely restricted evaporative loss, the amount of transpiration may have increased due to increased vegetative cover and presumably increased removal of soil moisture through likewise expanded root systems. Our analysis suggests that total event rainfall depth (an input) and evapotranspiration (a loss) are primary factors regulating flows through the rain garden network.

Conclusion: Chosen plants need to establish quickly because they are one of two major factors in regulating flow through a rain garden

The upper rain garden at St Francis Apartments - inflow attenuation area is seen on the left side. Note the density of the plants. This photo was taken 2 seasons after the installation of the garden.

The upper rain garden at St Francis Apartments - inflow attenuation area is seen on the left side. Note the density of the plants. This photo was taken 2 seasons after the installation of the garden.

We found that events with the largest flows to the combined sewer system had high total rainfall depth delivered over longer durations (i.e., 24 h). This suggested that average event intensity was not as important as total event rainfall depth.

Comment: good to know that the high intensity events were fully detained

The infiltration rate of the rain garden is four-times greater than that of the surrounding turf areas.

Comment: this is why rain gardens are better than grass! especially sloped areas of grass.

Soil profiles developed over time, and the stratification of the surface mulch layer was similar for both gardens. Serial, bi-annual mulching (2012, 2014) led to the development of a pronounced organic horizon in both gardens, which we attributed to the hardwood-chip mulch composting in place. Over the ensuing six years since construction, the surface horizons in both gardens stratified into the coarse, newer mulch layer that comprises the Oi horizon, which transitioned to the finer, older layer of organic matter that defined an Oa horizon. By 2016, the total organic layer thickness ranged from 4 to 13 cm, and 7 to 25 cm in the upper, and lower gardens, respectively.

Conclusion: Soil structure improved over the years due to mulch composting in place. Also, the garden was only mulched once every two years in the beginning. This probably helped to allow plants to spread and fill in as they became established.

We were particularly surprised that there was no evidence of degradation in upper garden infiltration rates, where the mass of sediment delivered ranged between 0.1 to 56 kg with a median of 8 kg per event.

Overall, the upper rain garden acted as a fine sediment filter, protecting the lower garden from sedimentation, such that the study-wide, event-wise maximum suspended sediment load into the lower garden was only 2 kg. This 75% decrease in fine sediment loading is in agreement with other field studies which reported 68 to 90% reductions in suspended sediment loads in networked rain gardens. Jenkins et al. observed that although the texture of rain garden surface soils was changed by settling of fine sediments over an eight-year study period, infiltration rates did not change. Taken in the context of the present study, the specific composition and thickness of the surface mulch layer may regulate the impact of sediment load on rain garden hydrology. Based on our data, we speculate that sediments were well-dispersed in the vicinity of the inlet, and ultimately incorporated into the thick organic surface soil, where their impact on infiltration rate was minimized.

Conclusion: The upper garden acted as a sediment filter for the lower garden. It seems that the mulch layer also may regulate sediment load. Bottom line: whatever sediment got in didn’t degrade infiltration over time.

From a practical standpoint, the event peak depth (via crest stage gauges) was always lower than the maximum freeboard depth in either rain garden; total inflow volume for any event was insufficient to fill either rain garden. This suggests that a smaller proportion of each rain garden was active in infiltration and drainage processes. Given the amount of unused surface area (and hence retention capacity) in both rain gardens, future outflow events in this network may be better mitigated by increasing the usable area. Some practical approaches that may be generalizable to other rain gardens include: engaging the unused network storage volume via flow-spreaders; facilitate movement of water to the perimeter by re-grading the gardens to create a slight slope toward the outer perimeter of each garden; and limiting the drainage area of underdrains to a close proximity near the inlet, forcing lateral water flow (fully leveraging subsurface storage) once the maximum vertical flow rate is attained.

Conclusion: Their data showed them that only a portion of their rain gardens were “active” in the infiltration and drainage process. Also, they never overflowed their banks. They suggest some practical additions to rain garden design that would allow more of the garden’s area to be active, all directed towards filling the garden up more effectively (flow-spreaders; grading toward the outer perimeter; limiting under drains to closest to the inlets to maximize storage within the gravel underlayer).

Although monitoring of volume reduction ended in fall 2015, ongoing 2016 measurements of soil structural and hydrologic characteristics indicate that soils were overall less compact, and had maintained or increased hydraulic conductivity. Given no other changes in the network, these measurements indicated that retention capacity and the overall operational dynamic of this rain garden network is stable. Retention of half of total inflow volume across four years of contrasting rainfall patterns is encouraging news for wastewater management with infiltration-type stormwater control measures.

St Francis Rain Garden just after planting

St Francis Rain Garden just after planting

St Francis Rain Garden functioning to detain stormwater

St Francis Rain Garden functioning to detain stormwater

They work! and they’re stable!

Rain gardens can be beautiful - install more of them people!

Plant List for St Francis Rain Gardens - sweet and simple!

Plant List for St Francis Rain Gardens - sweet and simple!

920x920.jpg
SlowTheFlowAtSchool-RainGarden.jpg
IMG_2084-e1538595131691-650x447.jpg

Here's the letter I sent to our School District in 2015. Spoiler alert - nothing happened!

Dear School District:

As many of you are aware, Irvington is in the beginning of a process designed to revitalize Main Street. This process will include traffic calming measures – something very important for the school district's children as well as the larger community – as part of an overall plan to make Irvington more walkable. Another important part of the process is to upgrade the landscaping all along Main Street. Aesthetics are a major element of "walkability" – something nice to look at. But landscaping is so much more than that – it’s the way we connect to nature. In 1948, Christopher Tunnard, the "father" of modern landscape architecture, penned these words:

"Our … gardens have a new mission - to fulfill the need for an affinity with Nature … In an age which has divorced itself from the life of the soil we need Nature's materials … – her sticks and stones and leaves, the stimulus of her proximity."

These words are still as true as ever. Feeling connection to the earth, to the seasons, to nature is an important part of our and our children's well-being. I sent a letter this spring alerting you to the fact that 2015 has been designated the International Year of Soil by the United Nations. I had hoped (and still do!) that the topic of soil would be given a special focus in the science curriculum at all levels this year. Soil science is an interesting and complex field – it’s a combination of geology, physics, chemistry and biology, so it affords excellent STEM educational opportunities and you can even get your hands dirty while doing it!

Your various District campuses have a lot of grass space (excluding fields) that takes time and water resources to maintain, not to mention the air and noise pollution caused by the mowers and blowers and the adverse effect of pesticides and fertilizers that are undoubtedly used on the grass.

There is another initiative started in 2014 called "Bring Back the Pollinators" – a Xerces Society Conservation Campaign with a Million Pollinator Garden Challenge. Their campaign has a lot of the same "hooks" as your PACE car program – you sign a pledge, you get a sign and so forth. But, more importantly, you either preserve or create pollinator habitat before you take the pledge. You learn why that is important – because pollinators are essential to the reproduction of over 85% of the world’s flowering plants, including more than two-thirds of the world’s crop species. Without pollinators, there wouldn't be fruits and seeds for birds and mammals to eat. Pollinators are at risk from habitat loss, pesticide use, and introduced diseases.

Especially in a Village like ours, it is important to include pollinator plantings wherever we can, because almost all of our land is developed, and on larger lots habitat is lost to lawns and swimming pools. On school property, habitat is lost to playing fields either made of plastic or groomed and mowed and seeded with a virtual monoculture of grass species.

Why not take the initiative to decrease some of the "lawn" areas on the various campuses by planting pollinator garden strips? At the Main Street School, you could use the grassy hillside between the school building and Village Hall for a pollinator garden. Such a garden would help with stormwater management on that hillside, where an open 6-inch PVC pipe daylights at the top of the hill, causing erosion and probably putting the Village Hall retaining wall at risk – easy to design a pollinator garden that would slow that stormwater down. At Dow's Lane, you could turn part of the land where the trailers used to be into a pollinator garden. At the Middle School/High School campus you could plant a pollinator garden strip along the base of the conservation easement on the east side of Meszaros field. There could still be a strip of lawn next to the track for people to sit on, but behind it (and nearer to the road) could be pollinator habitat garden. Also, the area where the detention basin is on your right side as you come up the hill is all grass – some of that could be turned into habitat as well.

Most of you probably realize that pollinator habitat gardens don't have to be intensively maintained once they are established. Most of the plants you will use thrive in poor soil – no need for compost or soil enrichment or whatever. Most of the plants that you will use are also drought-resistant, so that once they have grown for a couple of seasons and established their root systems, irrigation wouldn't be required except in times of extreme drought. There's an example of this up at the O'Hara Nature Center – the Xeriscape garden that I designed was installed a couple of seasons ago. It is not fenced to keep critters out and it has no irrigation system. It was watered with a hose a couple of times last summer when it didn't rain enough and weeded a couple of times. It is planted only with native species. There are shrubs, grasses and flowering perennials. Most everything came back after the winter and there’s been relatively little browsing by deer or other critters. If there had been more money, a few small trees could have been incorporated and the planted density could have been greater to help keep weeds at bay. Have a look at it now – none other than Joe Archino commented at the last Village Board meeting that it looked amazing. It's not perfect, but it sure is exuberant (and full of pollinators)! Pollinator gardens don't have to be "messy meadows" or "look weedy" – they can be designed just as your home landscape is and have flow and interest. A pollinator garden is maybe even better than a vegetable garden for students, because the plants start to come back (if they're perennials or grasses), leaf out and many will flower in the spring, before summer vacation. Vegetables really come into their own during the summer, when the kids aren't around – you can't even plant seeds outside until mid-May. A pollinator garden will still be flowering in fall when school starts again – in fact their fall look can be very beautiful if plants are selected for fall foliage color. You can pick the fall leaves and extract the color pigments and separate them out on a gel in chemistry lab. You can make art from the colored leaves. You can use the garden for photography class.

The gardens don't have to start out big. Think of them as "demonstrations" at first, just as was done at the Nature Center. Once you and the school kids see how cool it is, they will want to enlarge it over time. And that can be a science project in and of itself with continuity year to year.

Here are a few examples:

This is a circle garden in Tarrytown down by the river with no irrigation and no fencing. It is planted with a simple palette – three different species of ornamental grasses with different heights and habits, Joe Pye weed and Verbena bonariensis. The pattern in which the grasses and flowers are planted provides the flow – the grasses provide structure, color, texture and motion in the wind.

Here's the pollinator garden at Stone Barns along the main driveway. It happens to also be a stormwater management bioswale. The showy fall color is from sumac, a native shrub with prominent seedheads beloved by birds who use them as winter food.

The High Line – Quintessential example of pollinator paradise in the middle of the city in a confined space – the plant list for that garden is available on line so it should be easy to find good plants to use.

I'd be happy to share my enthusiasms in further discussions if you want.

Sincerely,

Ann Acheson

OK, what’s happened since then? …

  • First, the Year of Soil came and went with not so much as a whisper of studying it in our schools. Don’t you think our kids should learn about soil? Do you think any of them know how complicated soil is or why its important to the world?

  • Second, the Million Pollinator Garden Challenge has since achieved its goal - so there are more than a million new pollinator gardens out there. That’s a good thing! You can’t get the signs any more, though, unless you contribute $55.

  • Third, we have indeed started improving our Main Street streetscape. We’re finding that the logistics of traffic calming measures are more complicated than first thought. But, nevertheless, drive down Main Street and check out Village Hall and its new plaza and plantings (designed and installed by the Ann Acheson Landscape Design, Christina Griffin Architect and Cronin Engineering Team). We may see a butterfly there yet!

  • Fourth, the Xeriscape Garden I spoke about has since become overgrown with weeds then painstakingly cleaned up several times. It now has an “official” gardener taking care of it - Bravo! - so I’m happy. I’m still pretty proud of that garden, I have to say.

  • Fifth, the Tarrytown grass garden I showed the picture of has since been neglected and several cars/trucks have run over parts of it. For the most part, the grasses are still there, so the garden still “reads” not too badly from a distance. But the moral of the story is that gardens in public spaces need to be “owned” by someone and weeds have to be kept at bay.

    That, my friends, is why there’s so much grass in public spaces - you can’t mow a garden - or CAN YOU? Remember, a Roy Diblik garden can be mowed once in March and then left alone for the rest of the year. But of course that’s only after its been designed by someone with knowledge of the appropriate plants and allowed to establish itself while being tended to.

  • Sixth, the school district decided to install paving instead of landscaping in the small central courtyard on the Middle/High School campus because the grass wouldn’t grow and whatever landscaping was there died. Couldn’t they have challenged their students to come up with a solution? Our kids need to be connected to the earth, not to artificial turf and asphalt.

Moral of the Story: Irvington School District listen up! Do some landscaping and involve the students!

715eb-monarch.jpg

Conifer Cone Production

Why don’t I see cones on my Norway spruces every year?

A stand of conifers may look like they change little from year to year, but in fact the number of seeds and cones they produce varies widely. Conifers produce cone crops erratically; there will be years of complete cone failure, years of poor to moderate cone production, and, periodically, years in which a staggering number of cones burden the trees – referred to as “mast years”. “Mast” was first used to describe “the fruit of forest-trees (beech, oak, chestnut, pecan, etc.), especially if having fallen from the tree, used as fodder for pigs and other animals”. In modern usage it refers more generally to the edible vegetative or reproductive part produced by woody species of plants, i.e. trees and shrubs, that wildlife species and some domestic animals consume. Mast includes acorns, nuts, berries, drupes, catkins, rose hips and conifer cones.

Yummy!

Yummy!

Bumper mast years produce such an excess of cones that predators can’t possibly consume them all – guaranteeing the tree opportunities for successful seed dispersal, germination, and recruitment. Mast years usually occur in cycles, every two to seven years. Any individual tree which masted in a generally non-mast year would be subjected to the exclusive attention of the seed predators and so would be selected against.

This shows how the numbers of cones vary from year to year (data from NRC website) - mast years are pretty obvious but also note that the number of cones goes down to zero in intervening years.

This shows how the numbers of cones vary from year to year (data from NRC website) - mast years are pretty obvious but also note that the number of cones goes down to zero in intervening years.

Why any given year is a mast year is not fully understood, but certainly is affected by year-to-year climate variations. The largest cone crops follow optimal conditions: a cool growing season two years before a cone crop, allowing trees to grow and build reserves; a hot spring in the year preceding a cone crop, stimulating trees to initiate cone development; and cool growing con- ditions the year of a cone crop, enabling maximum development of the cones. The trees’ reserves are exhausted during a masting event, resulting in very few cones the following year.


Not all cones are seed cones. Seed cones are the female fruits of conifer species, and a typical seed cone’s woody scales cover and protect the ripened ovules underneath them. Seeds are impressed against the inner wall of each scale. Though they don’t look the same, the male reproductive organs that provide pollen are also considered to be cones.

Male cones release pollen in the spring, which is transferred from male to female parts by WIND, not by insects, birds, or other pollinators.

Wind pollination: male cones releasing pollen. The pollen grains are so light that they float upwards, which is why the female cones are at the top of the tree.

Wind pollination: male cones releasing pollen. The pollen grains are so light that they float upwards, which is why the female cones are at the top of the tree.

This is a real picture from the National Parks Department website of clouds of pollen being released by conifers. It looks this way because the pollen grains float upward and create a haze. Pollen release takes place in a restricted time frame over …

This is a real picture from the National Parks Department website of clouds of pollen being released by conifers. It looks this way because the pollen grains float upward and create a haze. Pollen release takes place in a restricted time frame over only a few days.

The reproductive cycle for a Norway spruce takes two years. Cone buds are initiated and differentiate in the early summer (Year 1). In the following year (Year 2) the cone buds flush, pollination and fertilization occur and embryo and seed development are completed. Seed fall begins in the autumn and may continue into the spring of a third year.

In spruces seed cones occur towards the top of the crown and pollen cones are concentrated in the mid to lower crown. Both types of cone are borne on 1-year-old shoots. In Norway spruce the female buds appear only in terminal positions and the male buds occur in lateral positions along the length of the shoot.

In Year 1 bud differentiation begins at about the cessation of lateral shoot elongation, towards the end of July. Buds become dormant during November, at which time they contain all their needles and reproductive cells for the next season.

By mid May of Year 2, the cones have flushed and are readily visible on the trees. The pollen cones appear red and as they elongate and as pollen is shed they turn yellow. By mid-May seed cones have opened and they turn to the vertical position and are green, reddish-green or red.

Pollen shedding and pollination occur in late May (of Year 2) and fertilization occurs in late June. By late August the seed cones are green and are now hanging downward on the trees. During September, the drooping seed cones are much more visible because they’ve turned reddish brown in the tops of the trees. Seed shedding begins in late October, and can continue until the spring of Year 3. In Norway spruce, seed shedding occurs by dropping some of the cones, and also by some cones opening while still held on the branches, dispersing the seeds via the wind. This means that in some years there might be mature cones left on the tree even though new cone production is low or non-existent, and in other years there might be mature cones and developing cones on the same tree.

Mature cones and developing cones on the same Norway spruce. The developing female (seed) cones are upright and red-colored, whereas the mature cones that hadn’t fallen off the tree are brown and hanging downward.

Mature cones and developing cones on the same Norway spruce. The developing female (seed) cones are upright and red-colored, whereas the mature cones that hadn’t fallen off the tree are brown and hanging downward.

Disruption of the reproductive cycle can occur in a couple of ways: Trees may fail to initiate cone buds because they lack the required energy reserves. Frosts in spring can damage emerging cones. Poor weather, particularly rain at the time of pollen shedding, can reduce pollination. Insect damage and premature conelet drop may occur.

But some of our nursery practices may also affect whether cones are produced

Another relevant issue is how the Norway spruce that you buy in a wholesale or retail nursery has been grown. It has likely been sheared, maybe more than once if you’ve bought it as an 8-footer or taller. Shearing is done to create uniformity of shape and to ensure dense branch structure. Shearing differs from pruning in that shearing concentrates on removing only the terminal portion of the new shoots, generally less than half its length. Shearing will not only shorten the annual growth of these shoots, but will also result in more shoots. This will create a more compact plant than one that is not sheared and one with denser foliage – it will look “better” to the buyer. Shearing is generally done just after lateral growth has stopped and hardened off (late summer) – shortly after cone bud differentiation would have started – and since seed cones are in a terminal position on spruce trees, shearing can easily remove nascent seed cone buds.

Also, the tree you buy, if its fairly tall already, is probably in balled and burlapped form, having been field grown and mechanically dug. Since spruces have unusually shallow roots, the process of mechanical digging cuts off a great deal of the tree’s total root mass; spruce tree root mass is more like a pancake than a muffin – the bigger the tree the larger the diameter of the pancake. Mechanical digging creates a root ball with a fixed diameter, meaning that bigger spruce trees end up having the most compromised root masses when they’re dug. The newly-planted tree’s first priority for energy expenditure will be to regenerate its roots. So it is not unusual for spruce trees in the nursery trade not to set cone buds for a number of years after planting.

Proven Winners National Plants of the Year 2019

Its a bold branding choice…

But their approach seems to be paying off, and I can only conclude that its because their testing and quality control measures live up to their marketing skills.

www.provenwinners.com

pw_co-ex_1gal_1modifiedrgb72.jpg

Why Proven Winners?

OK, lets be honest, it does feel good when you show up at client’s house with plants in the distinctive white Proven Winners containers – after all it tells the client that the plant is a winner and maybe you’re a bit of a winner as well. They cost a bit more – sometimes a lot more – so what are you paying for and how have they been proven to be “winners”?

The Proven Winners website lays it out like this:

It All Starts With a Better Plant

The right plant for all places: A plant with poor genetics or a limited range of performance requires more chemical inputs to survive and perform. Proven Winners searches the world to find and select plants which are clearly superior to others of their type in our trials in Michigan, New Hampshire, California, Germany, Japan, and Florida. This selection process translates into better performance for the home owner with fewer chemical inputs. These plants are more resistant to disease and insect pests, have heat and humidity tolerance and the broadest geographic range of superior performance. All of which means they require fewer insecticides and fungicides, perform well at lower fertility levels, and overall are just tougher, proven performers.

Start healthy – stay healthy: In addition to strenuous testing for consumer performance, Proven Winners goes the extra step in protecting our plants and the consumers who use them. Every Proven Winners plant has been screened of all plant disease and viral organisms. It is not a fast or inexpensive process and usually amounts to about $5,000.00 per plant. Why do we do it? So that when the plants arrive at your local garden center, we know we have done everything possible to assure our consumers of the healthiest plant possible. It is really a simple concept – the gardener is more likely to succeed and value Proven Winners if they start with the healthiest plant possible, and we want people to remember Proven Winners as the best plants they have grown! Hence the slogan: A Better Garden Begins with a Better Plant.

They also explain their sustainability practices, including ensuring that their branded containers can be recycled by the homeowner in their normal recycling stream.

Also

Saving energy: Proven Winners greenhouse facilities are equipped with energy efficient lighting to help save energy. Plus, the material used in our greenhouse structures itself is highly energy efficient, meaning that at many times of year, the sun is our main source of energy and heat! And, many of our facilities are equipped with energy curtains that conserve heat during cold weather and provide shade on sunny days

Saving water: Proven Winners greenhouse facilities recapture and reuse significant amounts of water. Many of our greenhouse facilities are equipped with flood floors that reuse water. Also, in our production process we group plants according to water needs and soil type, allowing us to deliver the right amount of water needed by each plant – resulting in little waste. And, our high tech watering systems reduce overall waste of water and fertilizer.

Shipping More Locally: Proven Winners companies are located strategically throughout North America to provide young plants to finished growers that can serve their own local retail markets. This means that finished plants do not need to travel far to reach the end consumer.

Sustainability is what has sometimes been lacking in the green industry, so their practices are important and impressive. I imagine that all of these measures contribute now, or will in the near future, to managing the bottom line and to ensuring that plants arrive at their destinations more alive than dead.

…Proven Winners – “trialed and tested for gardening success like no other”

Nepeta X ‘Cat’s Pajamas’

Nepeta X ‘Cat’s Pajamas’

Hydrangea paniculata grandiflora ‘Little Quick Fire’

Hydrangea paniculata grandiflora ‘Little Quick Fire’

I guess for me the bottom line is this: I don’t believe that there is necessarily a “right plant for all places” - I think that kind of “Home Depot”-like mentality can be dangerous. All places are different, so our plant knowledge has to be broad and deep in order to be successful. But Proven Winners plants are high quality, healthy and you usually can’t go wrong if you choose one.

That being said, Proven Winners has instituted a program called “National Plants of the Year”

Proven Winners National Plants of the Year 2019

Visit the website to see information about these plants.

https://www.nationalplantoftheyear.com/

Candidates for Proven Winners’ National Plants of the Year are judged stringently by growers, retailers and home gardeners against the following criteria:

• Easy to grow

• Iconic

• Readily available

• Outstanding landscape performance

Annual of the Year: LEMON CORAL™ SEDUM (Zones 7 – 11)

Chartreuse foliage; same Sedum species as ‘Anglelina’. PW describe it as growing up to 10” tall and 14” wide.

Perennial of the Year: SUMMERIFIC® 'BERRY AWESOME' HIBISCUS (Zones 4 – 9)

Perennial hibiscus is a really great addition to moist areas in a sunny garden bed. Fast growers like this cultivar are prized because they have some “presence” in the summer before they bloom. This one has lavender flowers – a nice addition to the white- or red-flowering versions that are commonly planted.

Landscape Shrub of the Year: LOW SCAPE MOUND™ ARONIA (Zones 3 - 9)

Aronia is a native plant workhorse – not overly showy but with its moments – like great fall color and berries for the birds. This particular cultivar is described by PW as only growing “to 24” tall and 26” wide, doesn’t require pruning.” This would be a welcome addition to large areas where lots of shrubs are being planted – less pruning makes eveyone happier and the plant will also pack more bang for the buck in terms of fall color and berries because it is more compact. This cultivar has been available in the Niursery trade for a couple of years and has made me willing to plant aronia again.

Hosta of the Year: SHADOWLAND® 'AUTUMN FROST' HOSTA (Zones 3 – 9)

PW says “'Autumn Frost' brings light to shady spots with its broad, glowing yellow margins and frosty blue centers. …it typically grows to 12” tall and 24” wide. Plus, it's super cold hardy, returning reliably every year even in -40° temperatures.”

Mostly we can’t install hostas because of deer predation, but when we can we always love a new and interesting color and habit. There isn’t anything that adds more beauty to a shade garden (except hellebores) – although hostas do turn to snot at the first frost.

Rose of the Year: AT LAST® ROSA (Zones 5 – 9)

A fragrant Knock-Out-like rose? This is the holy grail for many landscape designers, who want the reliability, disease resistance and flower power of Knock Out roses and have resigned themselves to no fragrance. But I say – why have a rose if it isn’t fragrant? Maybe this cultivar will do the trick … worth a try certainly.

PW says:

“This rose combines the romance and fragrance of a fully-petaled tea rose and the no-nonsense practicality of a disease resistant landscape rose. It will bloom non-stop from late spring until frost with distinctive soft pink to sunset orange tones. Growing up to 4’ tall and just as wide…”

Hydrangea of the Year: FIRE LIGHT® HYDRANGEA PANICULATA (Zones 3 – 8)

At first I said to myself - do we really need another two-tone PG hydrangea?!? I was leaning towards saying no, we don’t, until I saw the pictures of this variety in one of the test gardens posted by Tim Wood whose trial gardens are in Michigan. It made all the others around it look pretty weak (thats the third picture in the series below). Fire Light gets pretty huge (up to 6' tall and 6’ wide) but has strong stems that hold the flowers upright.

Flowering Shrub of the Year: SONIC BLOOM® WEIGELA (Zones 4 – 8)

Weigela is definitely an “old-fashoned” shrub– its lovely in bloom but has an unruly habit that demands regular pruning. The flowers are nice, but the rest of the plant is pretty boring. One thing it has going for it is that deer don’t seem to favor it. I’ve planted a couple of different Weigela cultivars over the last few years – those with colored leaves and/or compact habits. Ideally, the burgundy-leafed cultivars could take the place of ‘Concorde’ barberry – I’m still not totally convinced of that although I don’t plant barberry anymore anyway.

This new series of “Sonic Bloom” weigelas from PW are said to rebloom “strongly” from midsummer to frost. That would be a good thing for a shrub border. (IF they really do rebloom - the boomerang (bloomerang?) lilacs seem less than impressive where I’ve used them). PW cultivars are: Ghost®, Pearl, Pink, Pure Pink and Red.

PPA 2019 Plant of The Year: Stachys monieri 'Hummelo' ... and some of the previous winners as well

The Perennial Plant of the Year is selected by the Perennial Plant Association (PPA) based on the following criteria:

• Suitable for a wide range of climatic conditions

• Low Maintenance

• Pest and disease resistant

• Readily available in the year of release

• Multiple season interest or excellent foliage

• Easily propagated by asexual ( division or cuttings) or seed propagation

Stachys monieri ‘Hummelo’ (Hummelo Betony aka Lamb’s Ears) is a low-growing perennial that thrives in sun to part-shade and well-drained soil. It is a cousin to the perhaps more familiar form of Lamb’s-Ears, Stachys byzantina (fuzzy, silvery large leaves and flowers that a lot of people remove right away) but not at all similar. ‘Hummelo’ forms large, mounded clumps of crisp green (non-fuzzy and somewhat crinkled) foliage. Its foliage is attractive when its not in bloom, but not as showy as that of Stachys byzantina. The real show comes in early to mid-summer, when sturdy spikes of lavender-rose flowers shoot up through the foliage, putting on quite a display.

Though this plant might be relatively unknown to many gardeners, it makes a unique addition to any sunny border. Once you try it, you'll see that it goes with just about everything else in the garden. It is very easy to grow, and its flowers attract bees and other pollinators. Removing faded flowers will encourage more buds to form for weeks on end. ‘Hummelo’ is an interesting and unusual perennial for near the front of the border. Plants may be clipped back hard immediately after blooming, to tidy up the clumps for the rest of the season. Easily divided in early spring.

Stachys m. 'Hummelo' received the highest rating out of 22 Stachys studied in the Plant Evaluation Trials at the Chicago Botanic Garden. The trial was run from 1998-2004 by Richard G. Hawke. Both Stachys byzantina 'Helene von Stein' (aka 'Big Ears') and 'Silver Carpet' also received very high scores.

Perhaps best of all, this cultivar came from Piet Oudolf’s garden and is one of his much-used favorites that you’ve seen many times in pictures and probably wondered: what is that pink flowering plant??!

Stachys ‘Hummelo’ is a reliable, deer-resistant and pest-free garden plant. Zones 4-8A

Here are the two different Stachys species side-by-side (S. byzantina on top and S. monieri below) - you can definitely see the similarities!

…and here it is in some Piet Oudolf-designed plantings…

And for good measure, lets remember some of the previous winners. I often say that you could make a perfectly beautiful perennial garden just using plants from this list, which now goes back more than 20 years. … “should auld acquaintance be forgot…”

Allium ‘Millenium’ (2018)

Allium ‘Millenium’ (2018)

Amsonia hubrichtii (2011)

Amsonia hubrichtii (2011)

Geranium ‘Biokovo’ (2015)

Geranium ‘Biokovo’ (2015)

Geranium ‘Roseanne’ (2008 - 10 years ago!)

Geranium ‘Roseanne’ (2008 - 10 years ago!)

Japanese Painted Fern (2004)

Japanese Painted Fern (2004)

Hellebore X hybridus (2005)

Hellebore X hybridus (2005)

Penstemon digitalis 'Husker Red' (1996)

Penstemon digitalis 'Husker Red' (1996)

Happy 2019!

If this was a Bullet Journal, I’d be writing down my goals for 2019 using some fancy writing. I’m as happy as the next guy to write with real pen on real paper, but, for now, I’m still using my “good luck” Green Cross clipboard that’s been with me since the beginning of this journey and my kitchen calendar.

truer words …

I’ll be sticking with the good old fashioned method - scribble, cross-out, stick post-it notes on it - newsflash, pre-IPhone, iPad, app mania we used paper calendars upon which you can write everyone’s birthday, anniversary, doctor’s appointments, c…

I’ll be sticking with the good old fashioned method - scribble, cross-out, stick post-it notes on it - newsflash, pre-IPhone, iPad, app mania we used paper calendars upon which you can write everyone’s birthday, anniversary, doctor’s appointments, class schedules etc ALL IN ONE PLACE without checking a screen and while gazing on a beautiful picture of fresh cut flowers

Here’s my inspiration picture for 2019

APLD Award-winning Maine Seaside Garden - not designed or installed by me but just how I would like some of my gardens to look in early fall - texture, color, flowers, pollinator-friendly, natural but not wild or weedy, fairly subdued tones

APLD Award-winning Maine Seaside Garden - not designed or installed by me but just how I would like some of my gardens to look in early fall - texture, color, flowers, pollinator-friendly, natural but not wild or weedy, fairly subdued tones

Goals for 2019

  • Learn (and understand) something new as often as possible

  • Plant More

  • Be inspired by every individual landscape - no repetitions. Piet Oudolf supposedly said, in response to someone asking him why he so freely shared his planting plans, “i always have new ideas”. That’s what I want to be like.

  • Be quiet sometimes

  • Keep better records (somehow!) of plants, whether or not they have proven “worthy”, try new ones, don’t settle for gas station plants

  • Don’t be afraid

  • Listen to my clients even when their ideas seem whacky - they’re trying to tell me something and I ought to figure out what

  • Give as many revised estimates as it takes - without feeling put-upon

  • Make sure to be grateful for how much fun this job is compared to almost everyone else’s